quarta-feira, abril 26, 2017

How to Create an Auto-Retweet and Favorite Bot for Twitter

How to Create an Auto-Retweet and Favorite Bot for Twitter


How to Create Retweet and Favorite Twitter Bot


How to create a Twitter bot that auto-favorites and retweets tweets containing particular keywords or hashtags. The twitter bot is written with Google Scripts.


APRIL 09, 2016


This tutorial explains how you can easily make a Twitter bot that will automatically favorite and/or retweet tweets that contain particular keywords or #hashtags. You need not know any programming and your Twitter bot will be up and running in few minutes.


You may be wondering why would anyone write a Twitter bot that mindlessly favorites or retweets tweets? Yes, bots can be used for spamming but if used properly, they can also help grow your Twitter network.


For instance, when people share a link from your website on Twitter, you can favorite that tweet and it will give an hint to the original poster that you are the author of that article. A brand may retweet tweets that contain positive mentions of their product. The list goes on.


Twitter Retweet Bot

The first thing you need to do is define a search phrase and any matching tweets will be retweeted or favorited by the bot. Add as many search conditions as possible to keep spam tweets away from your list. Some examples:


1. Tweets containing links to your website, but no retweets included

example.com min_retweets:5 OR min_faves:5 -RT


2. Tweets that include particular hashtag, but exclude tweets with links

#WhatAnAwesomeHashtag -RT -filter:links


3. Find all tweets sent from a particular location contain a conference hashtag

#hashtag near:”New York, NY” within:15mi


OK, next we need to build our Twitter bot app. Twitter has strict rules around bots that automate tweeting and therefore it is recommended that you create a separate Twitter account to test your bots.


Retweet and Favorite Tweets


Go to apps.twitter.com and create a new application. Fill-in the mandatory fields (name, description, URL) and click Create. Next go to Keys and Access Tokens and click the Create my Access Token button. Twitter will generate the Consumer Keys & Access tokens that we will need in the next step.

Open the Twitter Bots app and add the keys from the previous stop. Next go to the bots page and enter the search phrase.

Choose the action as either Retweet or Favorite from the dropdown and click the Create button to run your Twitter bot.

That’s it. The bot will run in the background, every hour, and favorite / retweet matching tweets. If you wish to stop the bot later, go to the same page and hit the Stop button. The full source of the Twitter retweet bot is available on ctrlq.org under the “do whatever you like” license.


Also see: Write Twitter Bots


COMMENT NEWSLETTER


domingo, março 05, 2017

add disk as hot spare in a mdadm RAID

You can check the current state of the array with cat /proc/mdstat. In this example, that's where the data comes from.
So let's assume we have md127 with 3 disks in a raid1. Here they're just partitions of one disk, but it doesn't matter
md127 : active raid1 vdb3[2] vdb2[1] vdb1[0]
      102272 blocks super 1.2 [3/3] [UUU]
We need to offline one of the disks before we can remove it:
$ sudo mdadm --manage /dev/md127 --fail /dev/vdb2
mdadm: set /dev/vdb2 faulty in /dev/md127
And the status now shows it's bad
md127 : active raid1 vdb3[2] vdb2[1](F) vdb1[0]
      102272 blocks super 1.2 [3/2] [U_U]
We can now remove this disk:
$ sudo mdadm --manage /dev/md127 --remove /dev/vdb2
mdadm: hot removed /dev/vdb2 from /dev/md127

md127 : active raid1 vdb3[2] vdb1[0]
      102272 blocks super 1.2 [3/2] [U_U]
And now resize:
$ sudo mdadm --grow /dev/md127 --raid-devices=2
raid_disks for /dev/md127 set to 2
unfreeze
At this point we have successfully reduced the array down to 2 disks:
md127 : active raid1 vdb3[2] vdb1[0]
      102272 blocks super 1.2 [2/2] [UU]
So now the new disk can be re-added as a hotspare:
$ sudo mdadm -a /dev/md127 /dev/vdb2
mdadm: added /dev/vdb2

md127 : active raid1 vdb2[3](S) vdb3[2] vdb1[0]
      102272 blocks super 1.2 [2/2] [UU]
The (S) shows it's a hotspare.
We can verify this works as expected by failing an existing disk and noticing a rebuild takes place on the spare:
$ sudo mdadm --manage /dev/md127 --fail /dev/vdb1
mdadm: set /dev/vdb1 faulty in /dev/md127

md127 : active raid1 vdb2[3] vdb3[2] vdb1[0](F)
      102272 blocks super 1.2 [2/1] [_U]
      [=======>.............]  recovery = 37.5% (38400/102272) finish=0.0min speed=38400K/sec
vdb2 is no longer marked (S) because it's not a hotspare.
After the bad disk has been re-added it is now marked as the hotspare
md127 : active raid1 vdb1[4](S) vdb2[3] vdb3[2]
      102272 blocks super 1.2 [2/2] [UU]

sábado, fevereiro 18, 2017

How to see CPU temperature on CentOS 7 and RedHat Enterprise Linux 7

How to see CPU temperature on CentOS 7 and RedHat Enterprise Linux 7


How to see CPU temperature on CentOS 7 and RedHat Enterprise Linux 7

Iam a new sysadmin of CentOS 7 server. How do I get my CPU temperature Information on CentOS Linux 7 or Red Hat Enterprise Linux 7 server?

You need to install Linux hardware monitoring tool called lm_sensor. This tool provides some essential command line utilities for monitoring the hardware health of Linux systems containing hardware health monitoring hardware including CPU and fan speed.

Find out your os version

$ cat /etc/centos-release
OR
$ cat /etc/redhat-release
Sample outputs:
CentOS Linux release 7.2.1511 (Core) 

Install lm_sensors package on CentOS/RHEL 7

Type the following yum command:
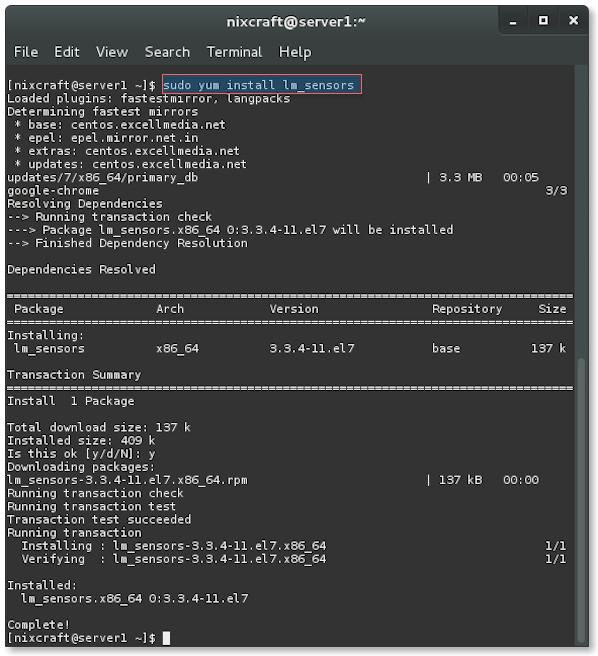
$ sudo yum install lm_sensors
Sample outputs:
Fig.01: Installing ln_sensors on CentOS 7/RHEL 7

How to configure lm_sensors

Type the following command and say YES to all prompts:
$ sudo sensors-detect
Sample outputs:
# sensors-detect revision 6170 (2013-05-20 21:25:22 +0200)
# System: ADI Engineering RCC-VE [1.0]

This program will help you determine which kernel modules you need
to load to use lm_sensors most effectively. It is generally safe
and recommended to accept the default answers to all questions,
unless you know what you're doing.

Some south bridges, CPUs or memory controllers contain embedded sensors.
Do you want to scan for them? This is totally safe. (YES/no): YES
Silicon Integrated Systems SIS5595...                       No
VIA VT82C686 Integrated Sensors...                          No
VIA VT8231 Integrated Sensors...                            No
AMD K8 thermal sensors...                                   No
AMD Family 10h thermal sensors...                           No
AMD Family 11h thermal sensors...                           No
AMD Family 12h and 14h thermal sensors...                   No
AMD Family 15h thermal sensors...                           No
AMD Family 15h power sensors...                             No
AMD Family 16h power sensors...                             No
Intel digital thermal sensor...                             Success!
    (driver `coretemp')
Intel AMB FB-DIMM thermal sensor...                         No
VIA C7 thermal sensor...                                    No
VIA Nano thermal sensor...                                  No

Some Super I/O chips contain embedded sensors. We have to write to
standard I/O ports to probe them. This is usually safe.
Do you want to scan for Super I/O sensors? (YES/no): YES
Probing for `Maxim MAX6639'...                              No
Probing for `Analog Devices ADM1029'...                     No
Probing for `ITE IT8712F'...                                No
Probing for `Fintek custom power control IC'...             No
Probing for `Winbond W83791SD'...                           No
Client found at address 0x50
Probing for `Analog Devices ADM1033'...                     No
Probing for `Analog Devices ADM1034'...                     No
Probing for `SPD EEPROM'...                                 Yes
    (confidence 8, not a hardware monitoring chip)
Probing for `EDID EEPROM'...                                No

Now follows a summary of the probes I have just done.
Just press ENTER to continue: 

Driver `coretemp':
  * Chip `Intel digital thermal sensor' (confidence: 9)

Do you want to overwrite /etc/sysconfig/lm_sensors? (YES/no): YES
Unloading i2c-dev... OK

How to get CPU temperature information on CentOS/RHEL 7 Linux

Type the following command:
$ sensors
Sample outputs:
coretemp-isa-0000
Adapter: ISA adapter
Core 0:       +48.0°C  (high = +98.0°C, crit = +98.0°C)
Core 1:       +48.0°C  (high = +98.0°C, crit = +98.0°C)
Core 2:       +48.0°C  (high = +98.0°C, crit = +98.0°C)
Core 3:       +47.0°C  (high = +98.0°C, crit = +98.0°C)