With everything configured, you can now boot your target system and configure it to boot from the network. It should get an IP address from your PXE server and begin booting Kali.
Booting Over HTTP ?
In this example, we will obtain the kernel, initrd, and squashfs filesystem we need from a full Kali Linux release ISO from within the “live” directory. We copy the initrd and kernel into the TFTP root folder, while the squashfs file goes into the web root:
mkdir /mnt/iso
mount -o loop kali-linux-1.1.0a-amd64.iso /mnt/iso/
cp /mnt/iso/live/{initrd.img,vmlinuz} /tftpboot/
cp /mnt/iso/live/filesystem.squashfs /var/www/
apachectl start
In this example, we’ll obtain the kernel, initrd, and squashfs filesystem from a full Kali Linux release ISO (in the “live” directory) and then proceed to boot the kernel and initrd over PXE. Once the boot screen appears, we need to alter a few boot parameters as shown in the screenshot below:
As the squashfs filesystem loads to RAM, the filesystem itself can’t be larger than the amount of RAM available on the computer – meaning that for booting a standard Kali ISO as shown above, we’d need at least 4 GB of RAM. Of course, this can be remedied by making smaller, custom Kali ISO images, perhaps with different toolsets and uses.
android tools linux user in plugdev group; are your udev rules wrong?
# Clone this repository
git clone https://github.com/M0Rf30/android-udev-rules.git
cd android-udev-rules
# Copy rules file
sudo cp -v 51-android.rules /etc/udev/rules.d/51-android.rules
# OR create a sym-link to the rules file - choose this option if you'd like to update your udev rules using git.
sudo ln -sf "$PWD"/51-android.rules /etc/udev/rules.d/51-android.rules
# Change file permissions
sudo chmod a+r /etc/udev/rules.d/51-android.rules
# If adbusers group already exists remove old adbusers group
groupdel adbusers
# add the adbusers group if it's doesn't already exist
sudo mkdir -p /usr/lib/sysusers.d/ && sudo cp android-udev.conf /usr/lib/sysusers.d/
sudo systemd-sysusers # (1)
# OR on Fedora:
groupadd adbusers
# Add your user to the adbusers group
sudo usermod -a -G adbusers $(whoami)
# Restart UDEV
sudo udevadm control --reload-rules
sudo service udev restart
# OR on Fedora:
sudo systemctl restart systemd-udevd.service
# Restart the ADB server
adb kill-server
# Replug your Android device and verify that USB debugging is enabled in developer options
adb devices
# You should now see your device
Question: I have a qcow2-type disk
image which is used by one my guest VMs on QEMU/KVM. I want to modify
the content of the disk image without powering on the VM, and for this I
need to mount the disk image somewhere. Is there a way to mount a qcow2 disk image on Linux?
When you run a guest virtual machine (VM) on a hypervisor, you create
one or more disk images dedicated to the VM. As a "virtual" disk
volume, a disk image represents the content and structure of a storage
device (e.g., a hard disk drive or flash drive) attached to the VM. If
you want to modify files in a VM's disk image without powering on the
VM, you could "mount" the disk image. You then would be able to modify
the content of the disk image before unmounting it.
In Linux, there are ways to mount a disk image, and different types
of disk images require different approaches. If you are using qcow2-type disk images (used by QEMU/KVM), there are at least two ways to mount them on Linux.
Method One: libguestfs
The first method to mount a qcow2 disk image is by using libguestfs which provides (among other things) a suite of tools for accessing and editing VM disk images. libguestfs supports pretty much all kinds of disk images including qcow2. You can install the libguestfs toolset on Linux as follows.
On Debian-based system:
$ sudo apt-get install libguestfs-tools
On Red Hat-based system:
$ sudo yum install libguestfs-tools
Once the libguestfs toolset is installed, you can mount a qcow2 image using a command-line tool called guestmount
as follows. Note that when a VM is running, you must *not* mount its
disk image in "read-write" mode. Otherwise, you run the risk of
damaging the disk image. Thus, it is safe to always turn off a VM
before mounting its disk image.
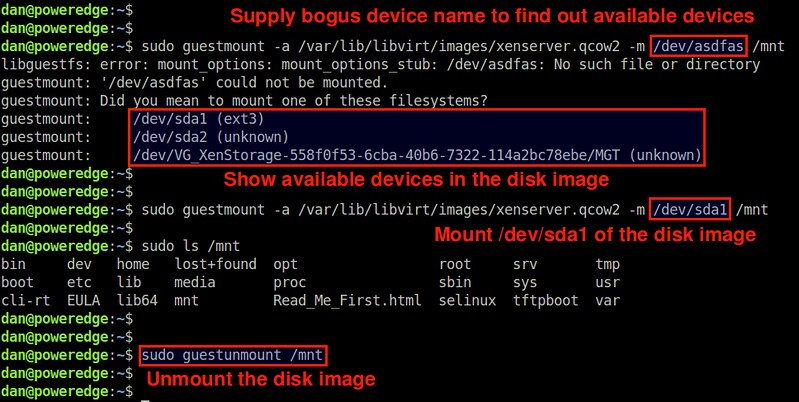
$ sudo guestmount -a /path/to/qcow2/image -m /path/to/mount/point
The "-m " option is used to specify a partition within
the disk image, that you want to mount (e.g., /dev/sda1). If you are
not sure what partitions exist in the disk image, you can supply any
bogus device name. The guestmount tool will then show you available device names to choose from.
For example, to mount /dev/sda1 in the disk image 'xenserver.qcow2' at /mnt mount point, run the following.
$ sudo guestmount -a /var/lib/libvirt/images/xenserver.qcow2 -m /dev/sda1 /mnt
By default, the disk image is mounted in "read-write" mode. So you can modify any file in /mnt after mounting it.
If you want to mount it in "read-only" mode:
$ sudo guestmount -a /var/lib/libvirt/images/xenserver.qcow2 -m /dev/sda1 --ro /mnt
To unmount it:
$ sudo guestunmount /mnt
Method Two: qemu-nbd
Another method to mount a qcow2 disk image is via qemu-nbd, a command-line tool that exports a disk image as a "network block device (nbd)".
You can install qemu-nbd on Linux as follows.
On Debian-based system:
$ sudo apt-get install qemu-utils
On Red Hat-based system:
$ sudo yum install qemu-img
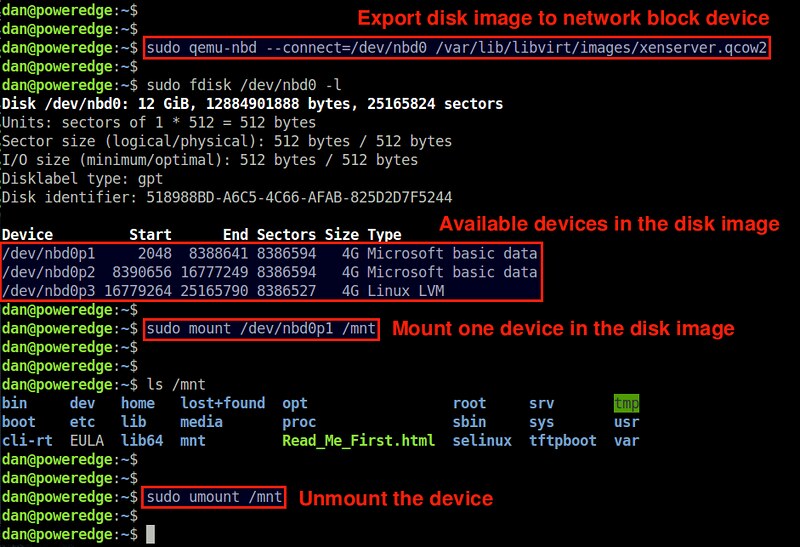
To mount a qcow2 disk image, first export the image to nbd as follows.
The first command loads the nbd kernel module. The "max_part=N" option specifies the maximum number of partitions we want to manage with nbd.
The second command exports the specified disk image as a network block
device (/dev/nbd0). As a network block device, you can use /dev/nbd0,
/dev/nbd1, /dev/nbd2, etc. whichever is unused. As for the disk image,
make sure to specify its "full" path.
For example, to export the image 'xenserver.qcow2' as /dev/nbd0:
After this, existing disk partitions in the disk image will be mapped to /dev/nbd0p1, /dev/nbd0p2, /dev/nbd0p3, etc.
To check the list of nbd-mapped partitions, use fdisk:
$ sudo fdisk /dev/nbd0 -l
Finally, choose any one partition (e.g., /dev/nbd0p1) and mount it to a local mount point (e.g., /mnt).
$ sudo mount /dev/nbd0p1 /mnt
Now you will be able to access and modify the content of the disk image's mounted partition via /mnt mount point.
Once you are done, unmount it, and disconnect the disk image as follows.
If you use LVM on the virtual disk image then you won’t be able to mount the partition directly – you’ll need to use the vg suite of tools to detect the logical volume. Run the two below commands vgscan and vgchange as below to detect the logical volumes.
vgscan
  Reading all physical volumes.  This may take a while...
  Found volume group "pve" using metadata type lvm2
vgchange -ay
   3 logical volume(s) in volume group "pve" now active
You can then use pvdisplay to find your volume name and mount it.
lvdisplay

  --- Logical volume ---
  LV Path                /dev/pve/myvolume
  LV Name                myvolume
  VG Name                pve
  LV UUID                jgok7M-c9x1-dTdt-PXXh-8NXf-BzgG-aRsaY7
  LV Write Access        read/write
  LV Creation host, time proxmox, 2015-04-06 20:28:28 +0100
  LV Status              available
  # open                 1
  LV Size                20.00 GiB
  Current LE             5120
  Segments               1
  Allocation             inherit
  Read ahead sectors     auto
  - currently set to     256
  Block device           253:0
/data/system/users/0/settings_ssaid.xmlAnd it looks like:
In order to change the ID for an application you need to follow a few simple steps:
1. Make sure that you have ROOT on your device2. Open file “/data/system/users/0/settings_ssaid.xml” with any editor that supports ROOT3. Change “value” and “defaultValue” to new Android ID.4. Save the file5. Reboot your device to apply changes
My current bank, one of Brazil's largest, provides its clients with one of several methods (in addition to their passwords) to authenticate to their accounts, online and on ATMs. I reverse engineered their Android OTP code generator and ported it to an Arduino-compatible microcontroller.
Disclaimers and more disclaimers
Some names have been changed or removed to protect the innocent. This project's results do not allow me or anyone else to hack into bank accounts, or even replicate a client's token without access to a rooted device with an active code generator. On the other hand, a malicious third party application with root privileges would have access to all the information required to generate codes, but would still need the account details (including a password) to fully compromise an account.
This is not a security vulnerability or even criticism by any stretch. The bank's code generation algorithm is (arguably) more secure than Google Authenticator (which keeps secrets around in plaintext), and this article should be seen as praise for the bank's app, which does things the right way by adhering to the TOTP standard, and protects its data as well as technically possible.
The company in question requested the following disclaimer to be published along with the article.
The application Chave de Segurança for mobile phones is secure, with it´s design and implementation being done following the best practices, and under International Standards (OATH - Initiative for Open AuTHentication) . The application security does not depend on executable code, and it´s customization is performed exclusively on the user´s mobile phone.
We reinforce the users to adopt safe behavior when using his mobile phone: do not disclose passwords/pin numbers; keep the mobile phone operating system integrity (only use original manufacturer updates); only install applications from official stores; use password to lock and unlock the cell phone; be suspicious of emails or SMS requesting passwords; never click on suspicious links.
A solução Chave de Segurança para uso em celular é segura, seguindo padrões internacionais (OATH - Initiative for Open AuTHentication), e boas práticas na sua concepção e implementação. Destacamos que a segurança da aplicação não depende do código executável, sendo sua personalização realizada exclusivamente no celular do usuário.
Reforçamos aos usuários a importância de sempre adotar atitudes seguras, dentre as quais destacamos: não divulgar senhas; manter o Sistema Operacional do celular íntegro (atualizar somente com versões originais do fabricante); somente instalar aplicações de lojas oficiais; usar senha para bloqueio e desbloqueio do celular; desconfiar de emails ou SMS que solicitem senhas; não clicar em links suspeitos.
My current bank, one of Brazil's largest, provides its clients with one of several methods (in addition to their passwords) to authenticate to their accounts, online and on ATMs. New accounts are usually provided with a credit-card sized piece of paper with 70 single-use codes which are randomly requested, once per access. This requires the client to obtain a new set of codes whenever they run out of them, which is not very practical.
Security card
A better alternative is their Android app (also available in several other platforms). It provides a Google Authenticator-like code generator, except it is PIN-protected, and requires a phone call to activate but operates seamlessly after that. Or so I thought.
I found myself calling the bank every so often after changing ROMs, resetting or changing phones. The activation process is simple enough, but the hacker in me did not enjoy the ordeal. I attempted to use Titanium Backup to no avail, for reasons I would soon understand. There was just one thing left to do - reverse engineer the application and build my own. Maybe make my own physical token using an Arduino.
Updates
Someone (sorry I couldn't find the message, ping me for credit) pointed out to me that the string deobfuscation would be handled by JMD. I had no idea a Java deobfuscator existed, so there's something to try before reverse engineering by hand.
Marcos Diez pointed out via e-mail that older versions of the app were not obfuscated at all. So there's something else to try that could save you some work when reverse engineering an app.
Activating the application
Before diving into the code, I had to go through the normal setup process once, which meant installing their app, calling the bank and activating it. Here are some screenshots of the process.
The first image shows the installation process. Look at all those permissions it requests! I'm sure they are all necessary for some reason, but none of them should be necessary to generate codes, right? The second image shows the actual activation process, inputting four numeric fields that have to be provided over the phone (notice I was in a call then). The third image shows the actual code generator, after a successful activation.
The toolset
Reverse engineering Android apps requires a few software tools. Here's what I used for this project:
A Java IDE to validate discoveries during the reverse engineering process.
Getting the APK file from the phone
The first step in reverse engineering an application is obviously getting the application. It is possible to download APK files directly from Google Play, but I decided to get the file directly from my phone, using ADB.
Enable USB debugging in your cell phone, then run the following commands.
Find the package name
$ ./adb shell pm list packages | grep mybank
package:com.mybank
You should now have a com.mybank-1.apk file in the current directory.
Extracting and converting the APK file
APK files can be extracted using the unzip utility, because they are ZIP files with a different extension (much like JAR files). Inside the archive, the actual code is in the classes.dex file, which I renamed to com.mybank-1.dex just to keep things organized.
Extract the package
$ unzip com.mybank-1.apk
(file list omitted for brevity)
You should now have a com.mybank-1-dex2jar.jar file in the current directory, which can be opened by JD.
Peeking at the code
After dragging the JAR file into JD-GUI, you should be greeted by a window similar to the following.
JD-GUI
Here's where the fun begins. While there are some obvious packages containing parts of the token module, such as br.com.mybank.integrador.token, br.com.othercompany.token and com.mybank.varejo.token, it doesn't take too long to realize that the core functionality is implemented in a few of the default package classes, which are obfuscated. Bummer.
Deobfuscating the exception strings
Here's a snippet from br.com.othercompany.token.GerenciadorConfig:
publicvoidtrocaPINcomLogin(int paramInt, boolean paramBoolean, Perfil paramPerfil)
{
if (paramPerfil == null)
thrownew IllegalArgumentException(a.a("1p5/eEf/sl3kbeUcP509qg=="));
if (!this.jdField_a_of_type_U.jdField_a_of_type_JavaUtilHashtable.contains(paramPerfil))
thrownew RuntimeException(a.a("86jcmKgr/ZshQu9aGVbuGscy2nHW4UEWqudRoUXhImQ=") + a.a("7u8KqqwqUD3a7FM339fp6pRrxUtQrHDMyqvZ6A2MurQ="));
if ((this.jdField_a_of_type_BrComOtherCompanyTokenParamsGerenciador.isPinObrigatorio()) && (!paramBoolean))
thrownew RuntimeException(a.a("aMsL/5kjkXKD4K1SvpTuuJZUS0U0fL19UT2GxjJ/QzQ="));
Configuracao localConfiguracao = paramPerfil.getConfiguracao();
if ((localConfiguracao.a().a()) && (paramPerfil != this.jdField_a_of_type_BrComOtherCompanyTokenPerfil))
thrownew RuntimeException(a.a("ASszutKFJW3iqDb7X/+vqAcYxTLXN2SJOIs0ne596Pu3ZoRxjiiscwhV6fT70efX"));
localConfiguracao.a().a(paramInt);
localConfiguracao.a().a(paramBoolean);
this.jdField_a_of_type_U.a(paramPerfil);
if (!paramPerfil.equals(this.jdField_a_of_type_BrComOtherCompanyTokenPerfil))
a(paramPerfil);
}
Every exception thrown by this piece of code is obfuscated, as well as many of the strings used throughout the code. That is a major roadblock, since exception messages and strings in general are a great way of figuring out what the code is doing when reverse engineering something.
Luckily, their developers decided to actually show useful text when a problem occurs and an exception gets thrown, so they wrapped those obfuscated strings with a.a, presumably a decryption routine that returns the original text. That routine is not too straightforward, but it is possible to get a high level understanding of what it is doing. Here are some findings after analyzing the a class and its dependencies:
Class p is a base64 decoder.
Class b is an AES implementation. Searching for its internal strings and constants on Google revealed that it is part of Paulo Barreto's JAES, a public domain crypto library.
private static byte[] a in class a is an obfuscated key, which can be deobfuscated by this short C program, basically replicating a snippet of the original a.a method.
#include#includeint main(int argc, constchar * argv[]) {
char keyin[] = {};
char keyout[16];
int i = 0;
for (i = 0; i < 16; i++)
keyout[i] = keyin[i] ^ keyin[31-i];
for (i=0; i < 16; i++)
printf("%01x", (unsignedchar)keyout[i]);
printf("\n");
return0;
}
This code yields the AES encryption key.
Unfortunately, a.a is not just a wrapper for JAES's AES class. It also does some crypto of its own. Here's some pseudopython for a.a:
In a nutshell, besides AES with an obfuscated key, this class appears to implement CBC (cipher block chaining) which was not present in the original JAES library.
A simple test to make sure it works:
$ ./decode "ASszutKFJW3iqDb7X/+vqAcYxTLXN2SJOIs0ne596Pu3ZoRxjiiscwhV6fT70efX"
Não é possível alterar PIN sem estar logado.
The message reads (in Portuguese) "it is not possible to change PIN without being logged in". Success!
Reverse engineering the code generation process
Deobfuscating the exception strings was a fun battle, but the war was not over yet. I had yet to figure out how to generate an authentication code myself. After looking around the code for a long while, I found a good entry point to the token generation process in the br.com.othercompany.token.dispositivo.OTP class. Here's a snippet, with the exception strings deobfuscated.
public String calculate() throws TokenException {
int i = (int)Math.max(Math.min((this.a.getConfiguracao().getAjusteTemporal() + Calendar.getInstance().getTime().getTime() - 1175385600000L) / 36000L, 2147483647L), -2147483648L);
a();
if (i < 0)
thrownew TokenException("Janela negativa"), i);
int j = (0x3 & this.a.getConfiguracao().getAlgoritmos().a) >> 0;
switch (j)
{
default:
thrownew TokenException("Algoritmo inválido:" + j, i);
case0:
return a(i);
case1:
}
return o.a(this.a.getConfiguracao().getChave().a(20), i);
}
This method basically generates a timestamp i which is the number of 36-second intervals since April 1st, 2007 at midnight (expressed as the Unix timestamp 1175385600000L). Why 36 seconds? That's how long each token lasts. Why April 1st, 2007 at midnight? No idea.
It also includes a correction factor (getAjusteTemporal(), which means temporal adjustment in Portuguese). I assume this is calculated at activation time as the difference between the server's and the device's clocks. In this snippet, o.a is the core token generating function, and its parameters are a byte array (a key) and the current timestamp.
Finding the key
The key is obtained by calling this.a.getConfiguracao().getChave().a(20) in the previous snippet. this.a is a Perfil (profile) object; getConfiguracao() returns a Configuracao (settings) object; getChave() returns a z object; a(int) returns a byte array, which is the key itself.
The z class is obfuscated but fortunately quite simple. It is just a wrapper around a byte array up to 32 bytes in length, and its a(int) method truncates that array to the provided length. The Perfil object, in turn, gets created by the PersistenciaDB (persistence database) class, which contains a bunch of obfuscated strings:
a = a.a("DwYyIlrWxIS9ruNMCKH/PQ==");
b = a.a("SceoTjidi0XqlgRUo9hcDw==");
c = a.a("yrYBlcp8nEfVKUT9WSqTqA==");
d = a.a("jUTzBfsP/AO/Kx/1+VQ3CQ==");
e = a.a("Y56SnU/pIKROPCLHu7oFuw==") + b + a.a("38oyp4eW3xqT3TaMfWZ5RA==") + "_id" + a.a("3Q+FCEVH2PxZ31ms4WHHwNB40EbmtWzHPhwoaB1nM7lGr+9zZzuVpx5iZ4YR+KUw") + c + a.a("bYYIl6LtqthcUCCFFb7JCRSC8zr5hKIFXe5JHFCCkZA=") + d + a.a("ENCtPBu4RtFta2XI1GsQag==") + a.a("ImPhDy43f+Nr4G5ofkZz+g==");
Finally! Investigating the a.a method pays off. Here are the deobfuscated strings.
a = "token.db";
b = "perfis";
c = "nome";
d = "data";
e = "create table perfis (_id integer primary key autoincrement, nome text not null, data blob not null);";
A SQL statement, interesting. So that's how it stores its profiles. And there's a filename too, token.db, probably a SQLite database. Further investigation of the carregar (load) method in PersistenciaDB class shows that, indeed, it is a SQLite database, accessed through the SQLiteDatabase class.
One might think it would only be a matter of getting the key from the database, then. Not so fast. The data blob is encrypted as well, as evidenced further in the carregar method by the use of the aa.a method (so much for descriptive names - blame the obfuscation). That method accepts as parameters the data blob, an empty buffer, and a parameter that gets passed through the carregar method - a key - truncated to 16 characters.
Before investigating the crypto behind aa.a, I decided to find the key to decrypt the blob. It gets passed as a parameter to the carregar method. After digging around for a bit, I found the class that generates the key: PersistenciaUtils. Here it is, in its entirety:
In other words, the SHA-1 digest of the device's android_id (a unique identifier), or a default value if that doesn't work. Notice that it hashes the hex string, not the actual bytes. So that's why Titanium Backup did not work when I tried it - I was not backing up this identifier, even though there was an option for that in Titanium Backup. It's too late to go back now though, let's keep reversing this app.
aa.a splits the data blob in several sequential fields: a 96-byte header, a 16-byte nonce, a 16-byte tag, and the rest of the blob as cryptotext. Further inspection of the aa class reveals some more details about the obfuscated classes:
Class e is an implementation of EAX, an AEAD (Authenticated Encryption with Associated Data) algorithm, from JAES.
Class f is an implementation of CMAC (Cipher-based Message Authentication Code), also from JAES.
Class h is an implementation of the CTR (counter) mode, from JAES as well.
Class l is an unknown implementation of the SHA-1 hashing algorithm. Interestingly, it is not used by the PersistenciaUtil class, which uses the MessageDigest class instead.
Class m is an unknown implementation of the HMAC (keyed-Hash Message Authentication Code) algorithm.
Class n is a wrapper around l and m, providing HMAC-SHA1.
The method aa.a derives a second key by computing the CMAC tag of the header and uses it to decrypt the cryptotext. In pseudopython:
If the EAX authentication succeeds, aa.a returns the decrypted content to PersistenciaDB, which then interprets the decrypted data.
Looking back at the PersistenciaDB class, now at the a method which parses the decrypted data into a Perfil object, it consists basically of a deserialization of the decrypted data into several booleans, shorts, and byte arrays. It is possible to identify several of the fields, of which three stand out (their offsets were discovered by adding along the deserialization).
And yes, this is finally the key I was looking for. My PIN matched, which was a welcome validation that my implementation was working correctly, and my time offset was small enough to ignore.
Understanding the code generation process
The key obtained at the previous step gets truncated to 20 characters in the OTP class, which then passes it along with the timestamp to the o.amethod. That method references several of the obfuscated classes identified in the previous steps, which is a relief. Based on that, here's some pseudopython for that method.
Basically the timestamp (a long, 8 bytes in length) gets (manually) turned into a big-endian byte array. That array gets hashed using HMAC-SHA1 employing the key as key, generating a hash. The last four bits of the hash determine an index at which an integer is read. Take that integer, modulo 1000000, and that's our code. Simple, huh? Yeah, I didn't think so either. But it works!
A while later, I found this snippet in Google Authenticator's implementation of TOTP:
public String generateResponseCode(byte[] challenge)
throws GeneralSecurityException {
byte[] hash = signer.sign(challenge);
// Dynamically truncate the hash// OffsetBits are the low order bits of the last byte of the hashint offset = hash[hash.length - 1] & 0xF;
// Grab a positive integer value starting at the given offset.int truncatedHash = hashToInt(hash, offset) & 0x7FFFFFFF;
int pinValue = truncatedHash % (int) Math.pow(10, codeLength);
return padOutput(pinValue);
}
Looks familiar? It's the exact same algorithm. In fact, only a couple of things prevented me from creating a Google Authenticator QR-Code from this data:
The arbitrary timestamp epoch of April 1st, 2007 at midnight.
The period, which is 30 seconds in Google Authenticator and 36 seconds in my bank's token. The key URI format used by Google Authenticator accepts a period parameter which could fix this, but the application currently ignores it.
Porting everything over to an Arduino (clone)
Or, rather, a Texas Instruments Stellaris LaunchPad I had lying around. They are actually code-compatible when using the Energia IDE, and I even used some Arduino-specific libraries:
A library for 2x16 LCD (like JDH162A or HD44780) written for Energia and Stellaris Launchpad (LM4F).
The RTC part needs improvement. Since the Stellaris LaunchPad does not have an onboard RTC, the internal clock needs to be set at each startup, which is cumbersome and requires a computer to get it going, and that's not very practical. For now, here's the complete code:
Instead of figuring out a way to set the clock at every startup, I used this hack in which the current time is filled in by the compiler just before the code gets uploaded to the board, resulting in a close-enough internal clock. RTClib generates timestamps with an epoch of Jan 1st, 2000 at midnight, so the code generator's epoch had to be converted to 228700800. A correction factor of 7200 was also required because the compiler fills in the local time instead of UTC, so it is two hours behind for me.
It is important to mention that this project's results do not allow me or anyone else to hack into bank accounts, or even replicate a client's token without access to a rooted device with an active code generator. On the other hand, a malicious third party application with root privileges would have access to all the information required to generate codes, but would still need the account details (including a password) to fully compromise an account.
I would like to thank Daniel Nascimento, Raphael Campos and Miguel Gaiowski for helping me review this article.
Finally, here's some proof that it works (a couple of seconds too fast) :)