http://www.desipro.de/ddwrt/K3-AC-Arm/
http://www.dd-wrt.com/phpBB2/viewtopic.php?t=177612
ftp://ftp.dd-wrt.com/betas/2014/
This has links to download DD-WRT kong builds, best I know.
sábado, maio 31, 2014
sexta-feira, maio 30, 2014
DD-WRT Guest Wireless
DD-WRT Guest Wireless - The Internet Home of Alex Laird


DD-WRT Guest Wireless
Introduction
If you’ve done any amount of work with routers, you know that it doesn’t take long to start craving consistency. And more advanced functionality that the cheap home interfaces simply don’t grant you. This is the point where you usually break down and start research things like Tomato, OpenWrt, and DD-WRT, just to name a few of the more popular alternatives.
These alternate firmwares don’t just provide a consistent administrative experience across all compatible models and brands, they also turn a cheap home router into a flexible and competitive enterprise router.
My Setup
DD-WRT is my personal firmware of choice. Powerful, flexible, and stable. One thing that I demand in a router is the ability to broadcast a secondary SSID for my guest’s to be able to access wireless internet in my home without also having access to my entire network of computers and devices.
Gladly, because my router’s firmware was extremely slow and buggy, I flashed my Cisco E2500 router with “mini” DD-WRT firmware (the E2500 also supports the “big” firmware). But after reviewing getting the two wireless networks setup on my router, it was brought to my attention that there are no good tutorials for how exactly you are to do this using DD-WRT. The tutorial provided on their own website, in fact, does not work. So, I find that it falls upon me to put out my particular configuration for two mutually exclusive wireless networks from a single router, both networks having access to the WAN port (that is, internet access). There are, of course, multiple ways to do this. Feel free to leave alternative suggestions in the comments.
Create Two Wireless Networks
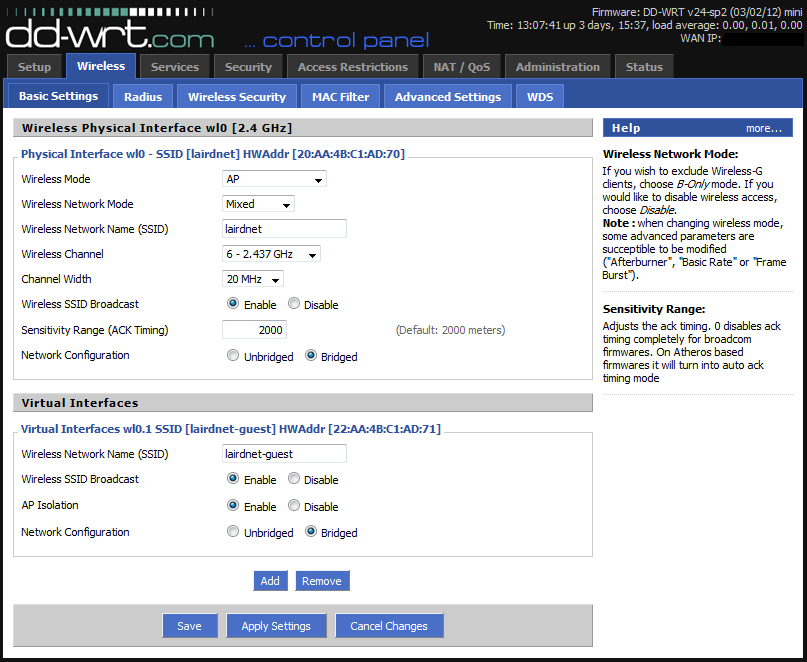
First, create your wireless networks by clicking clicking on “Wireless” and then “Basic Settings”. We’ll setup security in a moment. After you’ve configured your private wireless network setup, click “Add” under “Virtual Interfaces” to add the “wl0.1 SSID”. Give your guest network a separate SSID, and select “Enable” for “AP Isolation”.
Now click “Save” and “Apply Settings”.
Setup Wireless Security
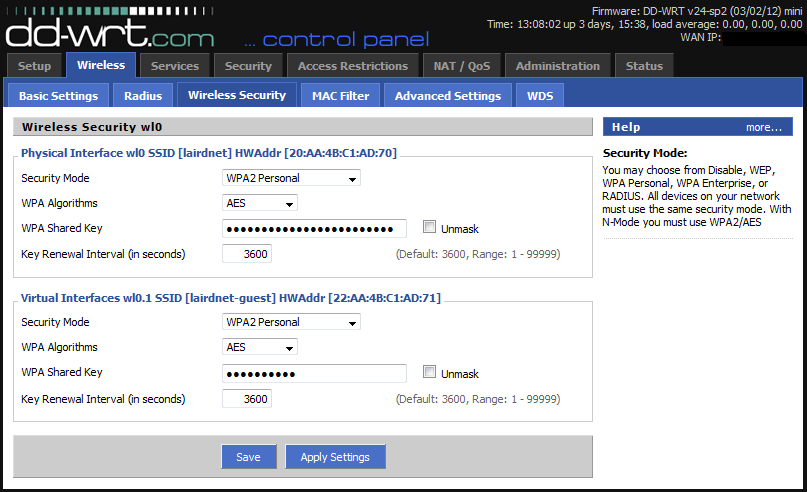
Navigate over to the “Wireless Security” tab. After you’ve setup the wireless security for your private network, setup similar security for your guest SSID. I would advise against leaving your guest wireless completely open, but since you’re going to be giving out this password to your guests, it should probably be a little simpler than your private network’s key.
Now click “Save” and “Apply Settings”.
Create Bridge
At this point, you have two wireless networks broadcasting on two separate SSIDs. Both networks should have internet access, but you’ll also notice both networks dish out IPs in the same subnet, and both networks are clearly able to see each other. While you may like and trust your guests, that doesn’t mean you necessarily want them to have access to all your network devices. To separate the network routing, we need to create a bridge and place the guest network into a different subnet.
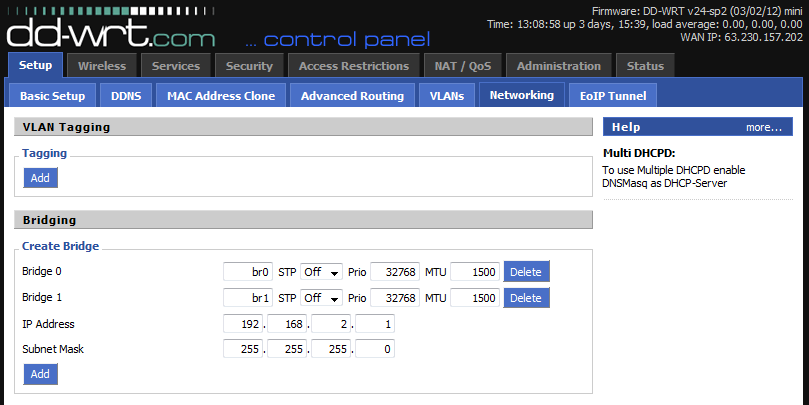
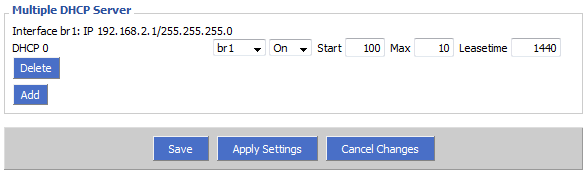
Click on “Setup” and then on the “Networking” tab. Under “Create Bridge” click “Add” to add a new bridge. Give the bridge a name, and modify the IP address of the bridge to be in a different subnet than your private network. For example, my private network grants IPs in the subnet 192.168.1.0/24, so my guest network in the image below is setup to grant IPs in the subnet 192.168.2.0/24.
Now click “Save” and “Apply Settings”. Though the page may refresh right away, you may need to wait about a minute before the bridge is available to use in the next few steps.
Assign Guest Network to Bridge
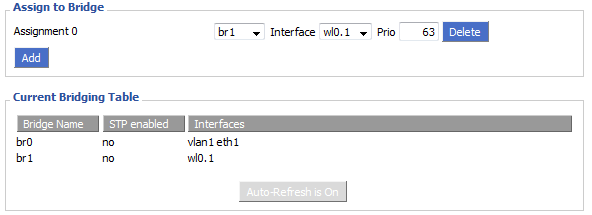
Under “Assign to Bridge” click “Add”. Select the new bridge you’ve created from the first drop-down, and pair it with the “wl0.1″ interface.
Now click “Save” and “Apply Settings”.
Create DHCP Server for Guest Network
We’re almost there! We’ve created a bridge in an alternate subnet, but the alternate subnet doesn’t have a DHCP server, so our guests currently cannot access the guest SSID (unless they assign themselves a static IP). Scroll to the bottom of the “Networking” page and under “Multiple DHCP Server” click “Add”. Ensure your newly created bridge name is selected from the first drop-down menu.
Now click “Save” and “Apply Settings”. Congratulations, we now have a working, separate guest network! Unfortunately, while users can connect to the network and DHCP is running, guest users aren’t able to access the internet quite yet.
Create Firewall Rules for Guest Network
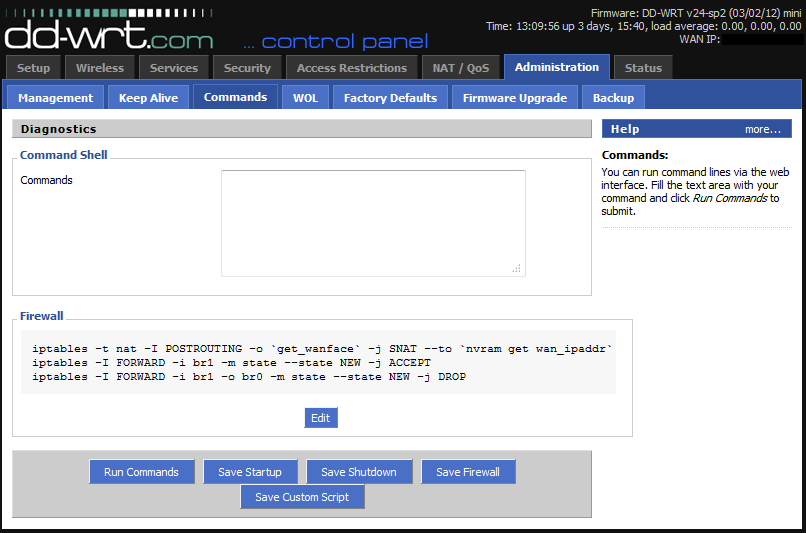
Navigate to the “Administration” tab and click on “Commands”. We need to add three rules to our firewall settings before our private network is completely secure and our guest network has internet access. Add these three rules (one per line) to the “Commands” text field, then click “Save Firewall” to ensure the rules execute even after the router is rebooted.
1 2 3 | iptables -t nat -I POSTROUTING -o `get_wanface` -j SNAT --to `nvram get wan_ipaddr`iptables -I FORWARD -i br1 -m state --state NEW -j ACCEPTiptables -I FORWARD -i br1 -o br0 -m state --state NEW -j DROP |
Improve Guest Security
Pete Runyan commented with a few more ways to nail down the security of the guest network. For one, your guests likely assume that their device on the guest network is not accessible from other devices on the same network, so you’ll want to add the firewall rules below to make that true. It’s also probably unnecessary (depending on your needs) to allow users on the guest network SSH, Telnet, or GUI access to the router. Append these firewall rules to harden the security of all of your networks!
1 2 3 4 5 | iptables -I FORWARD -i br0 -o br1 -m state --state NEW -j DROPiptables -I INPUT -i br1 -p tcp --dport telnet -j REJECT --reject-with tcp-resetiptables -I INPUT -i br1 -p tcp --dport ssh -j REJECT --reject-with tcp-resetiptables -I INPUT -i br1 -p tcp --dport www -j REJECT --reject-with tcp-resetiptables -I INPUT -i br1 -p tcp --dport https -j REJECT --reject-with tcp-reset |
Conclusion
You should now have two working SSIDs: a private one for your home network, and a guest network for your visitors. Both networks should have internet access. The private network will function the same as a LAN and single wireless network did before, with the wireless network having full access to the LAN connections. The guest network, on the other hand, is separated from the private network. Additionally, each individual device on the guest network is separate from another, so guests cannot see each other.
If you’ve gotten to this point and something is not working, or your guest network does not have internet access, don’t be alarmed. DD-WRT is a always evolving, and it’s entirely possible bridge settings or firewall rules for the latest build have changed. If this tutorial does not produce the desired result, please leave a comment below. I’ll try to always keep the tutorial updated with instructions for the latest DD-WRT build.
quinta-feira, maio 29, 2014
Difference between DD-WRT BrainSlayer, Eko, Fractal, and Kong Builds | Steve Jenkins' Blog
Difference between DD-WRT BrainSlayer, Eko, Fractal, and Kong Builds | Steve Jenkins' Blog
By Steve Jenkins|August 21st, 2013|Linux, Technology|17
By Steve Jenkins|August 21st, 2013|Linux, Technology|17
It’s a question asked in the DD-WRT forums all the time. It’s a question often asked in the comments of my DD-WRT posts. And it’s a question to which no “official” answer from the primary maintainers of DD-WRT exists… and therefore it will probably keep getting asked. However, based on my experiences (and some conversations with some of the builders themselves), I’ll take my best stab at explaining the differences between the various popular builds of DD-WRT, particularly those released by BrainSlayer, Eko, Fractal, and Kong — and finish with an explanation of why you really should ignore theRouter Database on the DD-WRT website. I welcome updated and corrected information in the comments, and I’ll incorporate it into the post.
First, let’s start with BrainSlayer. His real name is Sebastian Gottschall, and he’s the founder and primary maintainer of the DD-WRT project. As such, BrainSlayer gets the final say regarding what bits are included in the “official” stable release versions. However, the last stable release, known as Version 24 Service Pack 1(or more commonly seen as v24 SP1) came out way back in July 2008. Since then, the WiFi technology landscape has changed massively, there’s been flurry of development activity in the third-party open source router firmware space, and literally hundreds of new router models have come on the market. That means that BrainSlayer’s goal of creating and packaging “one firmware to rule support them all” is a major challenge.
BrainSlayer actively contributes to the DD-WRT source code, and tracks all source code development with the Trac SVN system (you can view the timeline of that developmenthere). Every new code changeset that gets committed to the system is automatically assigned a changeset number (for an example, click here to see what changeset 22212 looks like). Because it’s an open source project, anyone is welcome to download any version of the DD-WRT source code from the SVN and compile their own binary firmware file.
Which brings us to the difference between “source code” and “build.” Most open source projects have a central repository where the source code is managed, and developers make changes to that source code based on feature requests and bug reports from users. Source code is generally hardware “agnostic” — meaning it’s not targeted specifically to one particular hardware platform. Take the open source browser Firefoxas a well-known example. Even though the Windows, Mac, and Linux versions of Firefox all share the same central source code, you can’t run the Windows version of Firefox on Mac or Linux, or the Mac version on Windows or Linux, or the Linux version on Windows or Mac. That’s because source code needs to be compiled (or built) for a specific hardware platform before it can be used on that platform. DD-WRT is no different. Even though they may share the same source code, a DD-WRT firmware file that was compiled specifically for a Linksys router won’t run on a Netgear or Belkin router (and in fact, might break it).
When BrainSlayer himself builds a set of binaries (based on one of the changesets in the source code), that’s called a BrainSlayer build. BrainSlayer builds do not happen often, and are only available on the DD-WRT website. Final “stable” builds (like the one from July 2008) are always BrainSlayer builds. “Official” development releases (listed on the front page of the DD-WRT website) are also BrainSlayer builds. BrainSlayer’s development builds tend to focus on supporting only the most recent router hardware. As such, most of the BrainSlayer “development” releases are generally not compatible with router hardware that may be only 1-2 years old. And the “stable” releases are so old (again, 2008!) that you’re missing out on a massive amount of features by running them… which is why other contributors’ builds are popular among open source firmware users.
If you examine the SVN timeline, you’ll see that BrainSlayer isn’t the only person committing changesets to the project. On the DD-WRT About Page, he lists a number of other contributors to the project, including Ales Majdic — better known in DD-WRT circles as Eko. Eko is less active these days, but used to be a major contributor of bug fixes and new features to the DD-WRT source code. He is perhaps best known for being one of the first developers to create separate builds (called “rolling” a build) that incorporated older drivers for some of the older hardware (referred to as “VINT” for “vintage”). In those builds, Eko removed some newer packages from the source that wouldn’t compile properly for older router hardware (especially Broadcom). Even though Eko no longer actively creates test builds, his older builds can generally be found on the DD-WRT website and still work on older hardware.
Another popular builder is Kong. Kong’s older “kongmod” builds focused on making tweaks to the source code to allow compatibility with certain types of hardware, with an emphasis on getting as many features and drivers working on various router hardware, even if that means patching some of the drivers with versions that are even newer than the ones used in the official source. But that’s no longer the case. BrainSlayer has since granted write permission to the DD-WRT source code repository, so Kong no longer creates patches outside of the source — and no longer creates “kongmod” builds. His patches and tweaks are now contributed directly to the DD-WRT source code project, and his current builds are (in his words) “plain DD-WRT without any extras.” Kong recently told me:
Thus you won’t have any benefits anymore by flashing my builds, except that I’m able to provide sometimes more recent builds, as I concentrate on a subset of supported routers. In addition to that I do some basic testing with the units I own and I usually don’t upload builds that have issues with basic functionality. Since Brainslayer cannot test each build on every router he supports you will see issues for his builds like fw not beeing flashable because it is a few bytes to big, or broken wireless etc. That’s the reason why my builds are popular among users that have the unit I develop for.
Kong’s builds (both the older “kongmod” and newer “plain dd-wrt” versions) can be found here. Kong also gave me a humorous description of how some of the well known DD-WRT contributors and builders could be considered:
Brainslayer is Master Yoda. I’m now Obi Wan. Fractal is a Padawan. Eko is a retired Jedi Master. There are a few more Jedi Masters e.g. Sash, Chris, Markus
Sash, Chris, and Markus are known contributors to the DD-WRT source code, but don’t actively create test builds. And Fractal? Let’s discuss him next.
Fractal is a relatively newer contributor to the DD-WRT project, and will also contribute to the main DD-WRT repository. Like Kong’s newer builds, Fractal’s builds are also based on the central DD-WRT source code, but with a primary focus on rolling builds for Broadcom-based hardware, especially the newer Cisco/Linksys routers. Fractal is known for rolling a large number of “trailed” builds specifically those types of units, which allows them to be flashed directly from the stock firmware. Fractal has told me:
I do / have been concentrating on Broadcom builds especially with the new hardware, aka E series routers, and now the AC devices. I roll trailed builds when I know something major has been fixed and I do contribute to the SVN trac, however I have not the Jedi master — I leave that to Brainslayer and Kong….
Fractal’s builds can be found here.
So, which build is right for you? In the past, that depended primarily on your hardware and your goals. For older Broadcom stuff, you’d run Eko. For bleeding edge features, you’d run a kongmod. For newer Broadcom stuff, you’d probably lean toward Fractal.
But now, with the DD-WRT source tree unified, and all the major builders and developers feeding into (and from) the same source code repository, it now matters a lot less which test build you run (especially if you have current WiFi hardware). If you insist on an older “official” build, even if that means you’re missing out on features, then go for a BrainSlayer “stable” build. The best advice I can give you when choosing the right build for you is the start with the DD-WRT wiki entry for your specific router model. It will (usually) contain up-to-date information regarding where you should at least start, and then watch the forums to see which builds are stable.
Where you shouldn’t go, however, is the “official” DD-WRT router database. It’s ridiculously outdated (which is a problem known to the DD-WRT developers), and probably won’t be improved until the next official stable release comes out (again, the last one was 2008). Users of routers with Broadcom internals are strongly encouraged to read what is referred to as the Peacock Thread before proceeding with any DD-WRT install. That tread includes the following:
DON’T USE THE ROUTER DATABASE! The router database has recommended some less stable builds, including SP1 and 13064 (10/10/09) build. I suggest using the builds that are recommended here or in Redhawk’s announcement above, rather than the ones in the router database. SP1 is full of bugs, and while 13064 is not nearly as bad, some are reporting connection issues fairly regularly. Sometimes the router database also has had the wrong build type. The router database is being worked on improve the recommendations but it still contains errors and bad builds. Do not skip over reading the install wiki for your router just because you got the files from the router database. You need to KNOW what to do with those files. The wiki usually has the right builds for particular routers. READ THE WIKI!
If you use a Linksys E4200 v1 router, I maintain a separate blog post that always includes my recommended build for that router (since that’s the one I use in a number of different locations). As long as I use that router and DD-WRT, that post will stay updated with the build I think works best.
To sum up, the bottom line is that all the builds, whether BrainSlayer, Eko, Fractal, or Kong, share the same central code from the official DD-WRT source. Those builders will pick a changeset number and create a build (whose build number matches the changeset on which it’s based), and then compile the source for the specific hardware models in which they focus.
Development versions of open source firmware (which all of these builds are) are different than what are considered “stable” or “release” versions. And one of the differences is that it requires a bit of work to inform oneself as to what will work best for you. If you’re not willing to put in that work, you’re better off just keeping the stock firmware that came with your router. But if you’re willing to read the DD-WRT wiki, browser through and participate in the forums, and seek out blog posts like this one, you’ll be rewarded with the ability to squeeze the maximum performance out of your router hardware.
I welcome your comments and feedback below. I also welcome corrections, especially from any of the individuals mentioned in this post (I always prefer to get official information direct from the source). Please be aware that I don’t offer DD-WRT support, and I can’t answer questions such as “I have XYZ router – what build should I be running?) Your best source of specific information about DD-WRT is always the DD-WRT forums. 
domingo, maio 25, 2014
How to send email using simple SMTP commands
For educational purposes, I need to send an email through an SMTP server, using SMTP's fundamental and simple rules.
I was able to do that using smtp4dev. I
telnet localhost 25 and and commands are:
terça-feira, maio 20, 2014
Installing DAHDI
Software Installation
Digium® hardware requires drivers and libraries that are not integrated with the Linux kernel. These drivers and libraries including application software, and may be obtained from Digium’s downloads server at: http://downloads.digium.comFor an introduction to Asterisk®, Digium’s telephony software, including information on its configuration, setup and features, please refer to: http://www.asterisk.org. For product-specific documentation inlcuding product’s manual and other related information please visit http://www.digium.com
Software Requirements
- Linux 2.6.18 or later
Digium recommends CentOS, Debian, RedHat, and Ubuntu distributions of Linux.
- Development libraries and headers for ncurses, zlib, openssl and libnewt
- GCC and standard software build tools
Debian like OS: # apt-get install gcc libncurses-devel kernel-devel kernel-smp-devel gcc-c++ libnewt-dev zlib-devel unixODBC-devel libtool make
Red Hat like OS: # yum install gcc ncurses-devel libtermcap-devel kernel-devel gcc-c++ newt-devel zlib-devel unixODBC-devel libtool make
Note: These commands includes optional libaries which are used by Asterisk and Asterisk-addons
Installation Steps
It is recommended that you use the most recent version of the Asterisk, DAHDI, and libpri software for the best results. If you have previously installed any of these, Digium recommends that you upgrade to the latest “-current” version of each.Also, please be aware that you may need to re-compile Asterisk if you are upgrading DAHDI or libpri. The Application programming interface (API) of these packges tends to change between versions, re-compilation is the only way that you make Asterisk's adapt to the new API.
- Download and install the latest DAHDI drivers. DAHDI is available for download from: http://downloads.digium.com/pub/telephony/dahdi-linux-complete
# wget http://downloads.asterisk.org/pub/telephony/dahdi-linux-complete/dahdi-linux-complete-X.X.X+X.X.X.tar.gz
# tar -zxvf dahdi-linux-complete-X.X.X+X.X.X.tar.gz
# cd dahdi-linux-complete-X.X.X+X.X.X.tar.gz
# make
# make install
# make config
# tar -zxvf dahdi-linux-complete-X.X.X+X.X.X.tar.gz
# cd dahdi-linux-complete-X.X.X+X.X.X.tar.gz
# make
# make install
# make config
- If you are installing a Digium Digital Card, download and install the latest version of libpri after installing DAHDI. libpri is available for download from: http://downloads.digium.com/pub/telephony/libpri
# wget http://downloads.asterisk.org/pub/telephony/libpri/libpri-X.X.X.tar.gz
# tar -zxvf libpri-X.X.X.tar.gz
# cd libpri-X.X.X/
# make
# make install
# tar -zxvf libpri-X.X.X.tar.gz
# cd libpri-X.X.X/
# make
# make install
Setup Asterisk on CentOS
Setup  on CentOS
We need to install all of Asterisk’s dependencies. These are programs that are required to be installed before you can compile asterisk. This is the list I use, it includes the source compilers, some needed development libraries, as well as some dependencies for various asterisk modules I like to load.
- Install Asterisk dependencies
yum install gcc gcc-c++ make openssl-devel newt-devel ncurses-devel doxygen libtermcap-devel libxml2-devel kernel-devel perl curl curl-devel
- We’ll install a MySQL database server to handle our CDR (call detail records) storage, and also to prepare the way for using the Asterisk Realtime Architecture (the ability to store our configuration parameters in a database as opposed to flat files).
yum install libtool-ltdl libtool-ltdl-devel unixODBC-devel mysql mysql-devel mysql-server mysql-connector-odbc
- Create a directory under /usr/src to keep everything tidy. Download all of the sources for this install.
cd /usr/src
mkdir asterisk
cd asterisk
wget http://downloads.asterisk.org/pub/telephony/asterisk/releases/asterisk-1.6.2.11.tar.gz
wget http://downloads.asterisk.org/pub/telephony/asterisk/asterisk-addons-1.6.2.1.tar.gz
wget http://downloads.asterisk.org/pub/telephony/dahdi-linux-complete/dahdi-linux-complete-current.tar.gz
wget http://downloads.digium.com/pub/libpri/libpri-1.4-current.tar.gz
tar zxvf asterisk-1.6.2.11.tar.gz
tar zxvf asterisk-addons-1.6.2.1.tar.gz
tar zxvf dahdi-linux-complete-current.tar.gz
tar zxvf libpri-1.4-current.tar.gz
- LibPRI. LibPRI is a library used by TDM cards (T1 / E1 cards, etc). Even if you don’t have one of these cards, it’s safe to install LibPRI – it won’t have any negative effects on your system.
cd /usr/src/asterisk/libpri-1.4.11.2
make clean
make
make install
- DAHDI. DAHDI means “Digium Asterisk Hardware Device Interface”, it’s pronounced “Daddy”, and it’s the replacement of the old Zaptel driver stack. DAHDI is the set of linux kernel modules and also a set of tools for interfacing with TDM cards. More importantly, DAHDI provides timing to several asterisk components, such as the MeetMe application as well as Music on Hold. If you don’t have a proper timing source installed, you’ll notice lots of stuttering pauses in any kind of audio playback (Music on Hold, IVR prompts, voicemail greetings) from asterisk. If you don’t have any TDM hardware installed in your server, DAHDI also provides a “dummy” driver that will provide a timing source to asterisk.
cd /usr/src/asterisk/dahdi-linux-complete-2.3.0.1+2.3.0/
make all
make install
make config
- Now you need to configure DAHDI. You do that by editing the following files, based on your situation. The files themselves contain lots of documentation, if you have no TDM cards and are only installing DAHDI for the dummy timing source, you can comment out every driver referenced in the modules file.
nano /etc/dahdi/modules
nano /etc/dahdi/system.conf
Set DAHDI to start automatically and then start it.chkconfig dahdi on service dahdi start
- Install Asterisk.
cd /usr/src/asterisk/asterisk-1.6.2.11/
make clean
./configure         # or ./configure --disable-xmldoc (if you get error)
make menuselect
Choose which options to install (audio files, voicemail storage, codecs etc.)make menuselect make make install
Install sample files in /etc/asterisk, install docs/manpages and set to start on boot.make samples make progdocs make config chkconfig asterisk on
Check Asterisk starts properly, by manually starting asterisk from the command line.asterisk -vvvvc *CLI> core stop now
Assuming it does start properly, you probably want to start it in the background:service asterisk start
- Asterisk-addons
cd /usr/src/asterisk/asterisk-addons-1.6.2.1
make clean
./configure
make menuselect
Choose what you do and don't want. Unless you really need oh323, deselect it as it can be the cause of compilation woes. Be sure to select at least the following items:- Applications – app_addon_sql_mysql
- Call Detail Recording – cdr_addon_mysql
- Resource Modules – res_config_mysql
make
make install
make samples
Edit /etc/asterisk/cdr_mysql.conf and add 'loguniqueid=yes' to the global section.
domingo, maio 18, 2014
DID based routing with Asterisk
DID based routing with Asterisk
| GENERAL INFORMATION | ||||||||||||
| In this guide we will configure inbound routing based on the DID (number) information returned by Callcentric. In order to do this you will need to do further editing to your current Asterisk configuration. Below we will provide the necessary information to configure your Asterisk installation to route based on the called DID in your Callcentric account. Understand that this guide presents the most basic configuration for configuring DID based routing and is meant as a learning tool to assist you in configuring your own complex routing. The setup information below is based on Asterisk 1.4; although most other older and newer versions should be very similar. Please note that Callcentric is not responsible for preventing unwanted physical or remote access your IP PBX. If your IP PBX is compromised then you will be responsible for any damage caused. Please be sure to read this guide regarding securing your IP PBX solution. | ||||||||||||
| RESOURCES | ||||||||||||
| Main Project: Asterisk - http://www.digium.com Help and Support: AussieVoIP sip_header information - sip_header AussieVoIP context information - contexts AussieVoIP extension information - extensions | ||||||||||||
| CONFIGURATION | ||||||||||||
| Prerequisites: In order to use this guide you will need a properly configured Asterisk installation which can receive incoming calls from Callcentric. You may double check our Asterisk setup guide to make sure that your system can at least initially receive incoming calls. Once you can receive incoming calls properly you may configure DID based routing by following the instructions below: | ||||||||||||
|
Assinar:
Postagens (Atom)