Installation ============ All you need to run ssh-ident is a standard installation of python >= 2.6, python > 3 is supported. If your system has wget and are impatient to use it, you can install ssh-ident with two simple commands: mkdir -p ~/bin; wget -O ~/bin/ssh goo.gl/MoJuKB; chmod 0755 ~/bin/ssh echo 'export PATH=~/bin:$PATH' >> ~/.bashrc Logout, login, and done. SSH should now invoke ssh-ident instead of the standard ssh.Problem with ssh-agent. That can be solved with ssh-ident above!Configuring all of this on your machine
So, let's summarize the steps:
- Generate a set of keys, with
ssh-keygen.- Install your keys on remote servers, with
ssh-copy-id.- Start an
ssh-agentto use on your machine, witheval ssh-agent.ssh-addyour key, type your password once.- Profit! You can now ssh to any host that has your public key without having to enter a password, and use
ssh -Ato forward your agent.Easy, isn't it? Where people generally have problems is on how and where to start thessh-agent, and when and how to startssh-add.The long running advice has been to startssh-agentfrom your .bashrc, and runssh-addsimilarly.In today's world, most distributions (including Debian and derivatives), just start anssh-agentwhen you first login. So, you really don't have anything to do, except runssh-addwhen you need your keys loaded, and be done with it.Still many people have snippets to the extent of:if [ -z "$SSH_AUTH_SOCK" ] ; then eval `ssh-agent` ssh-add fiin their.bashrc, which basically says "is there an ssh-agent already running? no? start one, and add my keys".This is still very annoying: for each console or each session you login into, you end up with a newssh-agent. Worse: this agent will run foreverwith your private keys loaded! Even long after you logged out. Nothing and nobody will ever kill your agent.So, your three lines of.bashrcsnippet soon becomes 10 lines (to cache agents on disk), then it breaks the first time you use NFS or any other technology to share your home directory, and then... more lines to load only some keys, some magic in.bash_logoutto kill your agent, and your 4 lines of simple.bashrcget out of control
sexta-feira, abril 26, 2019
ssh-agent load only once with ssh-ident, ssh-add, ssh-keygen, eval `ssh-agent`
sábado, abril 20, 2019
complete How to Remove Viruses malware From Your Computer
https://youtu.be/CHtZ9-9ch2w
Download : https://www.reddit.com/r/TronScript/
Manual : https://github.com/bmrf/tron/blob/master/README.md
Download : https://www.reddit.com/r/TronScript/
Manual : https://github.com/bmrf/tron/blob/master/README.md
DO NOT DOWNLOAD TRON FROM GITHUB, IT WILL NOT WORK!! YOU NEED THE ENTIRE PACKAGE FROM r/TronScript
Tron is a script that "fights for the User." Think of it as a tech-on-a-thumb-drive that aims to automate ~85% of the tedious work in cleaning a Windows system, with the understanding that some things are better left to the discretion of the tech. It is built with heavy reliance on community input and updated regularly.
Bug reports, suggestions etc are welcome. If you have issues with this release, post a top-level comment and myself or one of the mods will answer, typically in < 24 hours.
domingo, abril 14, 2019
Raspberry Pi With 4 Relay Module ( for Home Automation )
https://www.instructables.com/id/Raspberry-Pi-With-4-Relay-Module-for-Home-Automati/
https://github.com/kasadawa/PiRelay/

Cheap, Effective and Modern Home Automation
Firstly we will connect the raspberry and the 4 array module and test it locally. The next step is to make a web app that will control our module . We will make it with apache server , php , javascript , jquery , bootstrap , bootstrap- switch buttons and some python . Everything is explained with a comments when you open the file , you also can see the documentation in github. The files are uploaded here and can be also find in github .
Step 1: What You Need
Picture of What You Need
We need :
Raspberry Pi
4 Array Relay Module
6 Wires
Wifi Dongle
Filezilla (optional)
SHH (optional)
Step 2: Wiring Picture of Wiring
Picture of Wiring
Picture of Wiring
We need to connect our Raspberry and the module .We will get the 5V from the Raspberry (not very recommended but its easy ) .So lets begin :
PI GPIO | Relay module
Pin 4 ---------VCC
Pin 6 ---------GND
Pin 8 ----------IN4
Pin 10 ---------IN3
Pin 11 ---------IN2
Pin 12 ---------IN1
Step 3: Testing
Picture of Testing
Picture of Testing
Now we need to start the raspberry and to connect to the power supply and connect to it over FTP with Filezilla or start it on monitor . Next download and put the test_relay.py file in the main dir (home/pi).Then start the python script by typing :
sudo python test_relay.py
If leds start flashing from IN1 to IN4 and shutdown from IN4 to IN1 then everything is okey and the wiring is like currect .We can move to the next step .
Explanation
The relay boards are powered by 5v and the relays are triggered by taking the input pin to ground. Since the Raspberry Pi's GPIO pins output 3.3v I used a set of transistors to take the relay pins to ground.
So when you are setting the GPIO output value:
1) 0 the relay starts ;
2) 1 the relay stops .
Attachments
test_relay.pytest_relay.pyDownload
Add TipAsk QuestionCommentDownload
Step 4: Installing Apache and Php
We will need them for the server part .Helpfull link.
To install apache2 we need to run :
sudo apt-get install apache2 -y
To test the webserver we can you on the raspberry browser
http://localhost/
or
http://192.168.1.10
(raspberry ip address) .Type
ifconfig
to get the current IP .
Next install PHP5 module for APACHE :
sudo apt-get install php5 libapache2-mod-php5 -y
And remove index.html file :
sudo rm index.html
The next thing is to navigate to the default directory:
For Raspbian Wheezy is /var/www ,
For Rspbian Jessie is /var/www/html
So we type :
cd /var/www/html
ls -al
And this will output :
total 12
drwxr-xr-x 2 root root 4096 Jan 8 01:29 .
drwxr-xr-x 12 root root 4096 Jan 8 01:28 ..
-rw-r--r-- 1 root root 177 Jan 8 01:29 index.html
We need to change the permission if we want to upload or modify files :
sudo chown pi: index.html
Delete the index.html file from the dir.
Step 5: Uploading the Needed Files for Your Web App
Picture of Uploading the Needed Files for Your Web App
You need to download the .rar file , extract it and copy the files with Filezilla to the main dir of Raspberry home/pi and to the var/www. For pasting the files into var/www you need to set a permision .
at var/www
bootstrap.css
bootstrap-switch.css
bootstrap-switch.js
changeState.php
firstCheck.php
index.html
jquery.js
at home/pi
firstCheck.py
relay_off.py
relay_on.py
When you are done coping the files , just go to your browser , type RaspberryIP/index.html (ex: 192.168.1.23/index.html) and the webpage will be opened .And also you can test it and remotely control the relays from any device that is connected to your local network(router) .
Enable sudo for APACHE
vi /etc/sudoers.d/010_apache2-nopasswd
User_Alias APACHE = www-data
Cmnd_Alias FIREWALL = /usr/bin/python
APACHE ALL = (ALL) NOPASSWD: FIREWALL
----
Attachments
PiRelay.zip PiRelay.zip Download
Step 6: How It Works Picture of How It Works


I will explain it shortly. If you want to get to more details you can see the project in github.
When we click on the button , the ajax request has been called and the php file from it is called . From the php we execute a python script file with some params . The python script return us json converted array , which we pass to the php and the php passes it to html file .We can go only in the one way but if we want to reload the page we need in what position the relays are . The other point is if we dont do it that way there is no feedback and we cant see what is happening .
https://github.com/kasadawa/PiRelay/
Cheap, Effective and Modern Home Automation
Firstly we will connect the raspberry and the 4 array module and test it locally. The next step is to make a web app that will control our module . We will make it with apache server , php , javascript , jquery , bootstrap , bootstrap- switch buttons and some python . Everything is explained with a comments when you open the file , you also can see the documentation in github. The files are uploaded here and can be also find in github .
Step 1: What You Need
Picture of What You Need
We need :
Raspberry Pi
4 Array Relay Module
6 Wires
Wifi Dongle
Filezilla (optional)
SHH (optional)
Step 2: Wiring Picture of Wiring
Picture of Wiring
Picture of Wiring
We need to connect our Raspberry and the module .We will get the 5V from the Raspberry (not very recommended but its easy ) .So lets begin :
PI GPIO | Relay module
Pin 4 ---------VCC
Pin 6 ---------GND
Pin 8 ----------IN4
Pin 10 ---------IN3
Pin 11 ---------IN2
Pin 12 ---------IN1
Step 3: Testing
Picture of Testing
Picture of Testing
Now we need to start the raspberry and to connect to the power supply and connect to it over FTP with Filezilla or start it on monitor . Next download and put the test_relay.py file in the main dir (home/pi).Then start the python script by typing :
sudo python test_relay.py
If leds start flashing from IN1 to IN4 and shutdown from IN4 to IN1 then everything is okey and the wiring is like currect .We can move to the next step .
Explanation
The relay boards are powered by 5v and the relays are triggered by taking the input pin to ground. Since the Raspberry Pi's GPIO pins output 3.3v I used a set of transistors to take the relay pins to ground.
So when you are setting the GPIO output value:
1) 0 the relay starts ;
2) 1 the relay stops .
Attachments
test_relay.pytest_relay.pyDownload
Add TipAsk QuestionCommentDownload
Step 4: Installing Apache and Php
We will need them for the server part .Helpfull link.
To install apache2 we need to run :
sudo apt-get install apache2 -y
To test the webserver we can you on the raspberry browser
http://localhost/
or
http://192.168.1.10
(raspberry ip address) .Type
ifconfig
to get the current IP .
Next install PHP5 module for APACHE :
sudo apt-get install php5 libapache2-mod-php5 -y
And remove index.html file :
sudo rm index.html
The next thing is to navigate to the default directory:
For Raspbian Wheezy is /var/www ,
For Rspbian Jessie is /var/www/html
So we type :
cd /var/www/html
ls -al
And this will output :
total 12
drwxr-xr-x 2 root root 4096 Jan 8 01:29 .
drwxr-xr-x 12 root root 4096 Jan 8 01:28 ..
-rw-r--r-- 1 root root 177 Jan 8 01:29 index.html
We need to change the permission if we want to upload or modify files :
sudo chown pi: index.html
Delete the index.html file from the dir.
Step 5: Uploading the Needed Files for Your Web App
Picture of Uploading the Needed Files for Your Web App
You need to download the .rar file , extract it and copy the files with Filezilla to the main dir of Raspberry home/pi and to the var/www. For pasting the files into var/www you need to set a permision .
at var/www
bootstrap.css
bootstrap-switch.css
bootstrap-switch.js
changeState.php
firstCheck.php
index.html
jquery.js
at home/pi
firstCheck.py
relay_off.py
relay_on.py
When you are done coping the files , just go to your browser , type RaspberryIP/index.html (ex: 192.168.1.23/index.html) and the webpage will be opened .And also you can test it and remotely control the relays from any device that is connected to your local network(router) .
Enable sudo for APACHE
vi /etc/sudoers.d/010_apache2-nopasswd
User_Alias APACHE = www-data
Cmnd_Alias FIREWALL = /usr/bin/python
APACHE ALL = (ALL) NOPASSWD: FIREWALL
----
Attachments
PiRelay.zip PiRelay.zip Download
Step 6: How It Works Picture of How It Works
I will explain it shortly. If you want to get to more details you can see the project in github.
When we click on the button , the ajax request has been called and the php file from it is called . From the php we execute a python script file with some params . The python script return us json converted array , which we pass to the php and the php passes it to html file .We can go only in the one way but if we want to reload the page we need in what position the relays are . The other point is if we dont do it that way there is no feedback and we cant see what is happening .
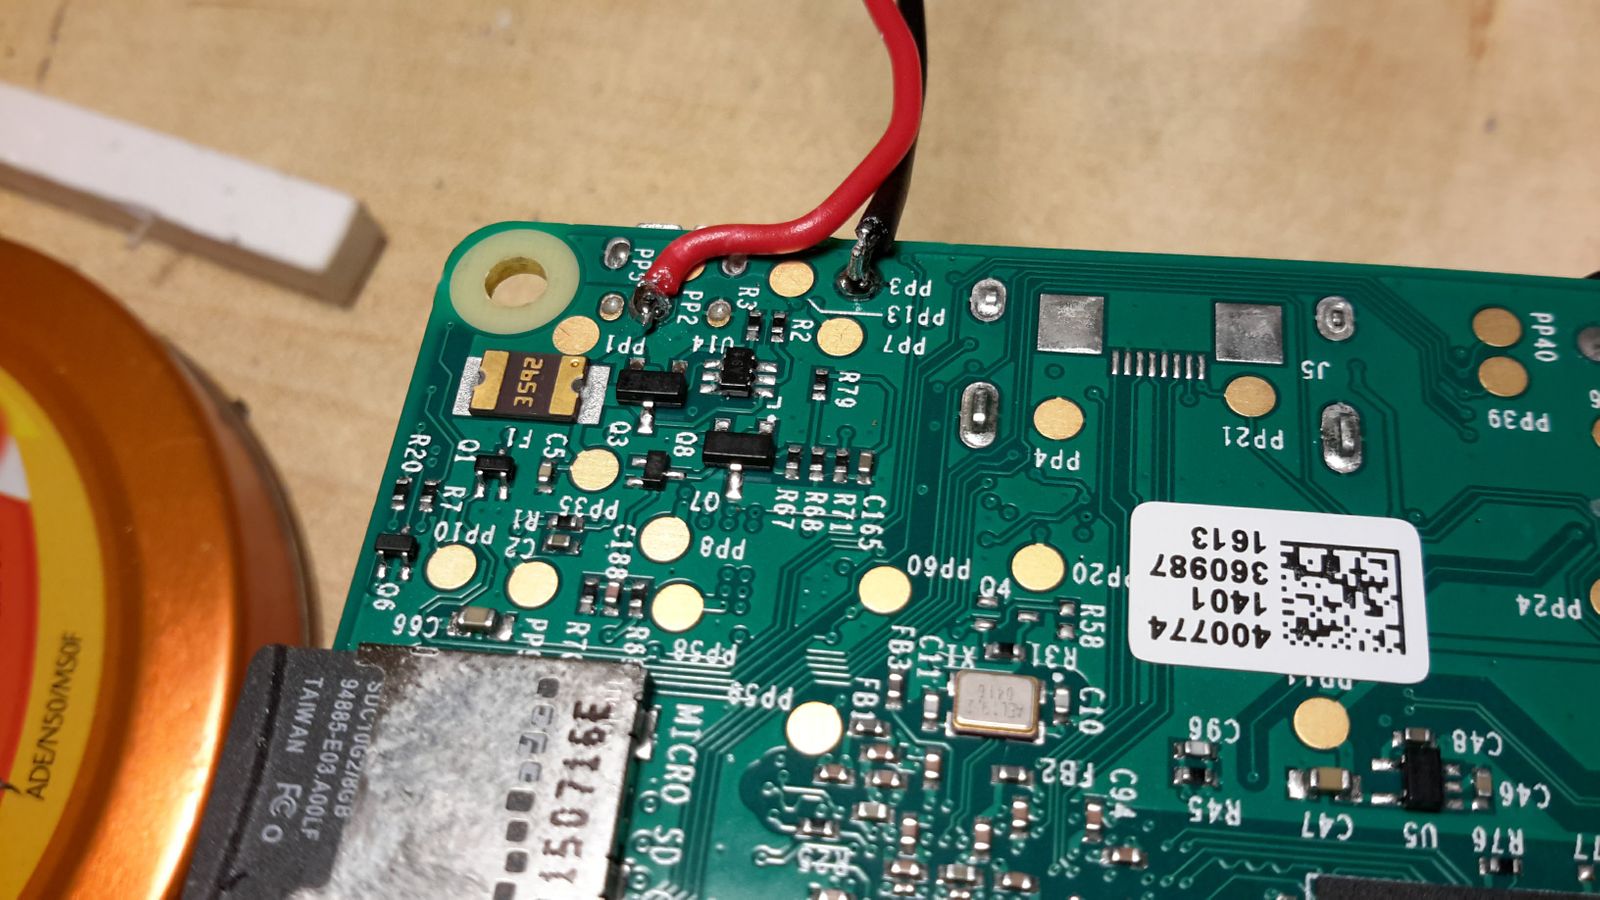
Bypassing USB Power Port on My Raspberry Pi Model B+ || power on raspberry 3 solder pp1 without micro usb
https://blog.shahada.abubakar.net/post/bypassing-usb-power-port-on-my-raspberry-pi-model-b?
With a Raspberry Pi 3. On this unit I used PP2 (Positive) and PP3 (negative), which according to the schematic here shows it as being located before the reverse protection diode. You can also use PP5 for negative but I found that a bit too close to PP1. Of course, it's best to cover the whole thing with hot-melt glue to minimize strain on the wires.
With a Raspberry Pi 3. On this unit I used PP2 (Positive) and PP3 (negative), which according to the schematic here shows it as being located before the reverse protection diode. You can also use PP5 for negative but I found that a bit too close to PP1. Of course, it's best to cover the whole thing with hot-melt glue to minimize strain on the wires.
Assinar:
Postagens (Atom)