OpenVPN repeatedly losing connections with inactivity timeout
openvpn inactive time out error
I’ve been seeing bizarre problems with my openvpn client (on linux) over the last couple of days. It would connect, and I could access the network, but the VPN would regularly restart itself and connections would be closed, seeing messages like
Tue May 22 13:19:43 2012 [OpenVPN_Server] Inactivity timeout (--ping-restart), restarting
Tue May 22 13:19:43 2012 TCP/UDP: Closing socket
I saw these problems when I tried my profile on several different computers.
I was unable to find anything on the internet about this (possibly my google fu was weak), but we’ve finally managed to track down the problem. I thought I’d put this here in case other people had the same issue.
This seems to happen when you’re running two openvpn clients with the same profile from different computers. I have two computers I use, and I’d left one idle running the VPN client. When I then tried to connect to the VPN from the other computer I would see this behaviour. I then (foolishly) left that computer trying to use the VPN when I went back to the first computer, so now the problem had mysteriously appeared there too.
Anyway, now that I know the issue it’s easy to avoid. Live and learn.
Troubleshoot delivery issues with Postmaster Tools
Gmail Postmaster Tools provides senders with metrics on parameters such as reputation, spam rate, feedback loop, etc. It can help you check compliance to the Gmail bulk sender guidelines, as well as identify issues that can cause trouble with the spam filter.
Authentication & Identification
Why is it important to authenticate your messages?
Authentication ensures that your messages can be correctly classified. Emails that lack authentication are likely to be rejected or placed in the spam folder, given the high likelihood that they are forged messages used for phishing scams.
In addition, unauthenticated emails with attachments may be outrightly rejected, for security reasons.
To ensure that Gmail can identify you:
Use a consistent IP address to send bulk mail.
Keep valid reverse DNS records for the IP address(es) from which you send mail, pointing to your domain.
Use the same address in the 'From:' header on every bulk mail you send.
We also recommend the following:
Sign messages with DKIM. We do not authenticate messages signed with keys using fewer than 1024 bits.
When you use rclone with Google drive in its default configuration you are using rclone’s client_id. This is shared between all the rclone users. There is a global rate limit on the number of queries per second that each client_id can do set by Google. rclone already has a high quota and I will continue to make sure it is high enough by contacting Google.
However you might find you get better performance making your own client_id if you are a heavy user. Or you may not depending on exactly how Google have been raising rclone’s rate limit.
Here is how to create your own Google Drive client ID for rclone:
Log into the Google API Console with your Google account. It doesn’t matter what Google account you use. (It need not be the same account as the Google Drive you want to access)
Select a project or create a new project.
Under Overview, Google APIs, Google Apps APIs, click “Drive API”, then “Enable”.
Click “Credentials” in the left-side panel (not “Go to credentials”, which opens the wizard), then “Create credentials”, then “OAuth client ID”. It will prompt you to set the OAuth consent screen product name, if you haven’t set one already.
Choose an application type of “other”, and click “Create”. (the default name is fine)
It will show you a client ID and client secret. Use these values in rclone config to add a new remote or edit an existing remote.
---
Google drive Background sync...
Google introduced Google Drive on April 24, 2012 and promised Linux support “coming soon.” That was nearly two and a half years ago. There’s now a somewhat “official” Google Drive client for Linux, but it’s probably not what you want.
Google has continued to affirm that they’re “still working on it” for the last few years. Google does use Linux internally, so it’s no surprise there’s a solution created by a Google Drive developer.
Update: The tool below has changed since we wrote this article, so be sure to consult the instructions on the official website for the latest installation and usage details.
Meet “drive” – “Background sync is not just hard, it’s stupid”
“drive” is a small command-line program that runs on both Linux and Mac OS X. It’s open-source and written in Google’s “Go” programming language. This program was written by Burcu Dogan, aka rakyll, a Google employee who has worked for Google Drive’s platform team. It’s even copyrighted by Google. Clearly, this is the closest thing to an official Google Drive client for Linux we’ve seen yet.
The application’s page at github lists all the reasons why a background-syncing Google Drive client — the kind of official client available for Windows and Mac — is “stupid” and “not worth to implement.” To be clear, this developer does say that she doesn’t speak for Google as a whole. We can’t just look at this page and ascribe what she says to Google or the Google Drive team. However, it’s clearly disappointing for Linux users to wait more than two years for a promised client only to see a Google Drive developer trash the entire concept of background-syncing and release a more limited client. If you’ve been waiting for a proper official client, this probably isn’t what you were waiting for.
For these philosophical reasons, “drive” doesn’t sit in the background and sync files back and forth. It’s a command you run when you need to push a file to your Google Drive account, or to pull a file from it to your local computer. The “drive push” command pushes a file to Google Drive, and the “drive pull” command pulls a file from Google Drive. The developer notes situations where this could be especially useful — if you store a virtual machine in your Google Drive, you might want to immediately sync a tiny text file rather than syncing the large virtual machine file first.
Using drive
To use this application, you’ll need version 1.2 or newer of Google’s Go language compiler installed. On Ubuntu 14.04, you can install it using the following command — this also installs other tools you’ll need:
After doing so, use the following command to download and install drive:
go get -u github.com/odeke-em/drive/cmd/drive
(This command has changed since the screenshot below was taken.)
You can then run the following command to get help:
drive help
First, you’ll need to initialize drive with the following command. It will ask you to choose a local directory and authenticate with your Google account.
drive init
Afterward, you can use the “drive push” command to push a file to the remote server — for example, “drive push example.txt” pushes a file named example.txt in the current folder to your Google Drive account. The “drive pull” command pulls a file from Google Drive to your computer — for example, “drive pull /text/example.txt” pulls a file named “example.txt” located in the Google Drive “text” folder to your local computer. It’s your job to push and pull files back and forth when you need them.
Grive is an open-source Google Drive client, but it’s still considered “beta” and hasn’t been updated in a year. It’s hardly an ideal option to trust your files with. Grive Tools is a package that provides desktop integration for the grive command-line program, making it easier to use and adding automatic sync. This solution apparently works pretty well, but it is a selection of tools layered on a beta-quality unofficial client, which doesn’t inspire the most confidence. However, it’s probably the most complete solution available and is more full-featured than the “official” dive tool.
Long-suffering Linux users might remember the sorry saga of Unreal Tournament 3. Epic Games had a good history of supporting Linux with their previous Unreal Tournament games, and they promised Unreal Tournament 3 would also be on Linux. The Linux client was delayed. Even after the game was released for Windows, they continued saying a Linux client was coming soon. They spent years regularly assuring concerned Linux users that the game was on its way — even showing off screenshots of it running on Linux. After about three years of this, Epic finally said, “Sorry but I don’t think this is going to happen anymore.”
Perhaps we’re now just waiting for Google to say the same thing about Google Drive for Linux. Google’s support of Linux has been good in the past — but so was Epic Games’.
When OS X shipped on a DVD a good number of years ago, you always had the convenience of a bootable installer—an OS X installer that could be used to boot your Mac if its own drive was having problems. But to install or reinstall a recent version of OS X, you must either download a non-bootable installer from the Mac App Store or (via OS X’s invisible, bootablerecovery partition) download 6GB of installer data from Apple’s serversduringthe installation process. In other words, you no longer have the same safety net or convenience.
Because of this, I recommend creating your own bootable El Capitan (OS X 10.11) installer drive on an external hard drive or USB thumb drive. If you need to install El Capitan on multiple Macs, using a bootable installer drive is faster and more convenient than downloading or copying the entire installer to each computer. If you want to erase the drive on a Mac before installing El Capitan, or start over at any time, you can use a dedicated installer drive to boot that Mac, erase its drive, and then install the OS (and subsequently restore whatever data you need from your backups). And if your Mac is experiencing problems, a bootable installer drive makes a handy emergency disk.
(OS X Recovery lets you repair your drive and reinstall OS X, but to perform the latter task, you must wait—each time you use it—for the entire 6GB of installer data to download. At best, that’s a hassle; at worst, it’s hours of waiting before you can get started.)
As with previous versions of OS X, it’s not difficult to create a bootable installer drive, but it’s not obvious, either. I show you how, below.
Keep the installer safe
Like all recent versions of OS X, El Capitan is distributed through the Mac App Store: You download an installer app (called Install OS X El Capitan.app) to your Applications folder. In this respect, the OS X installer is just like any other app you buy from the Mac App Store. However, unlike any other app, if you run the OS X installer from that default location, the app deletes itself after it's done installing OS X.
If you plan to use the OS X installer on other Macs, or—in this case—to create a bootable installer drive, be sure to copy the installer to another drive, or at least move it out of the Applications folder, before you use it to install the OS on your Mac. If you don't, you'll have to redownload the installer from the Mac App Store before you can use the instructions below.
What you need
To create a bootable El Capitan installer drive, you need the El Capitan installer from the Mac App Store and a Mac-formatted drive that’s big enough to hold the installer and all its data. This can be a hard drive, a solid-state drive (SSD), a thumb drive, or a USB stick—an 8GB thumb drive is perfect. Your drive must be formatted as a Mac OS Extended (Journaled) volume with a GUID Partition Table. (Follow this tutorial to properly format the drive if you're using OS X Yosemite or older. If you're using OS X El Capitan, use these instructions.)
Your OS X user account must also have administrator privileges.
Apple’s gift: createinstallmedia
In my articles on creating a bootable installer drive for older versions of OS X, I provided three, or even four, different ways to perform the procedure, depending on which version of OS X you were running, your comfort level with Terminal, and other factors. That approach made sense in the past, but a number of the reasons for it no longer apply, so this year I’m limiting the instructions to a single method: using OS X's own createinstallmedia tool.
Starting with Mavericks, the OS X installer hosts a hidden Unix program called createinstallmedia specifically for creating a bootable installer drive. Using it requires the use of Terminal, but createinstallmedia works well, it's official, and performing the procedure requires little more than copying and pasting.
The only real drawback to createinstallmedia is that it doesn't work under OS X 10.6 Snow Leopard—it requires OS X 10.7 Lion or later. Though it's true that some Macs still running Snow Leopard can upgrade to El Capitan, I think it’s safe to assume that most people installing OS X 10.11 will have access to a Mac running 10.7 or later.
Connect to your Mac a properly formatted 8GB (or larger) drive, and rename the drive Untitled. (The Terminal commands I provide here assume that the drive is named Untitled. If the drive isn’t named Untitled, the procedure won’t work.)
Make sure the El Capitan installer (or at least a copy of it), called Install OS X El Capitan.app, is in its default location in your main Applications folder (/Applications).
Select the text of the following Terminal command and copy it.
Warning: This step will erase the destination drive or partition, so make sure that it doesn’t contain any valuable data. Paste the copied command into Terminal and press Return.
Type your admin-level account password when prompted, and then press Return.
You may see the message “To continue we need to erase the disk at /Volumes/Untitled. If you wish to continue type (Y) then press return:” If so, type the letter Y and then press Return. If you don't see this message, you're already set.
The Terminal window displays createinstallmedia’s progress as a textual representation of a progress bar: Erasing Disk: 0%... 10 percent...20 percent...and so on. You also see a list of the program’s tasks as they occur: Copying installer files to disk...Copy complete.Making disk bootable...Copying boot files...Copy complete. The procedure can take as little as a couple minutes, or as long as 20 to 30 minutes, depending on how fast your Mac can copy data to the destination drive. Once you see Copy Complete. Done., as shown in the screenshot above, the process has finished.
Createinstallmedia will have renamed your drive from Untitled to Install OS X El Capitan. You can rename the drive (in the Finder) if you like—renaming it won’t prevent it from working properly.
Booting from the installer drive
You can boot any El Capitan-compatible Mac from your new installer drive. First, connect the drive to your Mac. Then, restart your Mac (or, if it's currently shut down, start it up) while holding down the Option key. When OS X’s Startup Manager appears, select the installer drive and then click the arrow below it to proceed with startup. (Alternatively, if your Mac is already booted into OS X, you may be able to choose the installer drive in the Startup Disk pane of System Preferences, and then click restart. However, sometimes OS X installer drives don't appear in the Startup Disk window.)
Once booted from your installer drive, you can perform any of the tasks available from the OS X installer’s special recovery and restore features. In fact, you'll see the same OS X Utilities screen you get when you boot into OS X Recovery—but unlike with recovery mode, your bootable installer includes the entire installer.
Question: I have an external USB drive which contains several LVM partitions on it. I want to access some of those LVM partitions on my Linux. How can I mount an LVM partition on Linux?
LVM is a logical volume management tool which allows you to manage disk space using the notion of logical volumes and volume groups. The biggest benefit of using LVM over classic partitions is the flexibility in allocating storage for users and applications without being constrained by the size of individual physical disks.
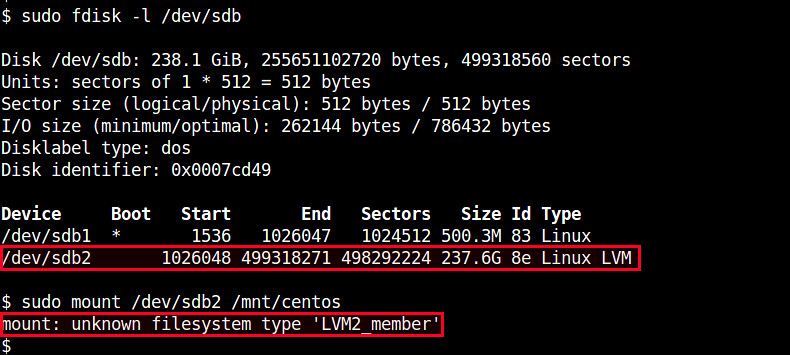
In LVM, the physical storage, on which logical volumes are created, is traditional partitions (e.g., /dev/sda2, /dev/sdb1). These partitions must be initialized as "physical volumes" and labeled so (e.g., "Linux LVM") in order for them to be used in LVM. Once the partitions are labeled as LVM volumes, you cannot mount them directly withmount command.
If you attempt to mount an LVM partition (e.g., /dev/sdb2), you will get the following error.
$ mount /dev/sdb2 /mnt
mount: unknown filesystem type 'LVM2_member'
If you want to mount an LVM partition properly, you must instead mount "logical volumes" created inside the partition. Here is how to to it.
First, examine a list of available volume groups by running:
The names of available physical volumes and volume groups are listed under PV and VG columns, respectively. In this example, there is a single volume group named "vg_ezsetupsystem40a8f02fadd0" created on /dev/sdb2.
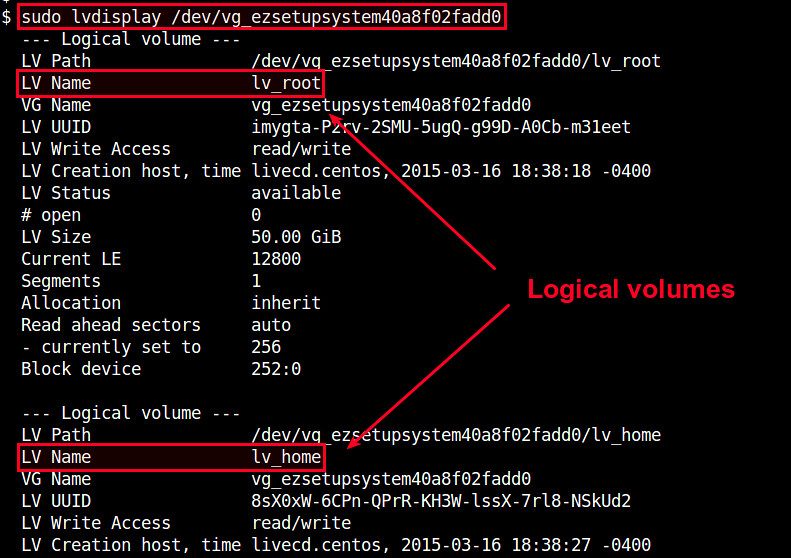
Next, let's check what logical volumes exist inside this volume group. For that, use lvdisplay command:
You need to activate a volume group after you attached it.
To activate all the inactive volumes on the system you would use a command like vgchange -a y
Or will be displayed as NOT available
$ sudo lvdisplay <volume-group-name>
Running lvdisplay shows information about available logical volumes (e.g., device name, volume name, volume size, etc) as shown below.
--- Logical volume ---
  LV Path                /dev/vg_ezsetupsystem40a8f02fadd0/lv_root
  LV Name                lv_root
  VG Name                vg_ezsetupsystem40a8f02fadd0
  LV UUID                imygta-P2rv-2SMU-5ugQ-g99D-A0Cb-m31eet
  LV Write Access        read/write
  LV Creation host, time livecd.centos, 2015-03-16 18:38:18 -0400
  LV Status              available
  # open                 0
  LV Size                50.00 GiB
  Current LE             12800
  Segments               1
  Allocation             inherit
  Read ahead sectors     auto
  - currently set to     256
  Block device           252:0
If you want to mount a particular logical volume, use its device name shown in "LV Path" (e.g., /dev/vg_ezsetupsystem40a8f02fadd0/lv_home) as follows.
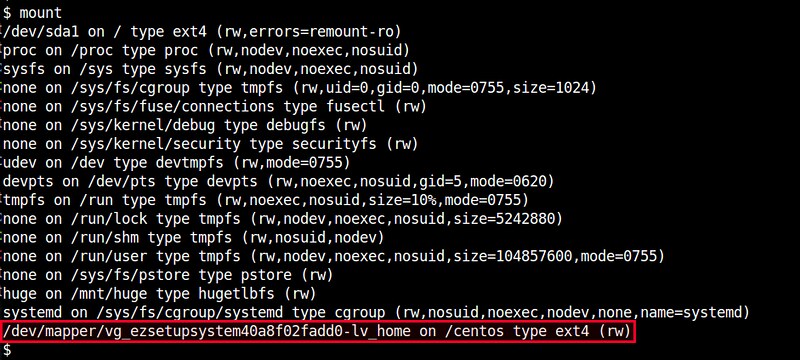
$ sudo mount /dev/vg_ezsetupsystem40a8f02fadd0/lv_home /mnt
You can check the mount status by running mount command without any argument, which will show you a list of all mounted filesystems.
$ mount
If you want to have a logical volume to be mounted automatically on boot, add the following line in /etc/fstab. You need to specify the file system type (e.g., EXT4) of the volume, which you can find out from the output of mountcommand above.
HowTo: Set an Environment Variable in Mac OS X - Terminal Only
The process of setting environment variables in the Terminal will be familiar to those with experience with Linux or UNIX. It involves editing files in /etc for global environment variables, and in your home directory for user specific environment variables.
Login shell vs non-login shell
A login shell is the shell that is started when you open a new terminal window. A non-login shell is when you start a sub-shell in the window, for example, typing bash when you have the bash shell running already.
Global PATH only
If you just want to edit the global PATH variable, you can put a file in /etc/paths.d with the path you want to add. For example, we will create a file /etc/paths.d/ec2-api-tools and put the following in:
/etc/paths.d/ec2-api-tools
1
/opt/aws/ec2-api-tools/bin
Open a new Terminal and $PATH will reflect the change.
Bash
Setting environment variables
The format for setting an environment variable in the bash shell is KEY=value with no spaces around the equal sign. In addition, when putting it in a configuration file it is necessary to prepend it with export. The following is an example of how to set an environment variable in one of the configuration files, it also works on the command line; we will set the variable JAVA_HOME to /Library/Java/Home:
Terminal - hostname:~ user$
1
export JAVA_HOME=/Library/Java/Home
Login shell
First /etc/profile, then whichever of the following exists, trying them in order: ~/.bash_profile,~/.bash_login, or ~/.profile
Non-login shell
/etc/bashrc, then ~/.bashrc
Have login shell read /etc/paths and /etc/paths.d
/etc/profile (Excerpt)
1
2
3
if[ -x /usr/libexec/path_helper ]; then
eval`/usr/libexec/path_helper -s`fi
Have login shell read /etc/bashrc and ~/.bashrc
/etc/profile (Excerpt)
-no
~/.bash_profile (Excerpt)
1
[[ -f ~/.bashrc ]]&& . ~/.bashrc
Setup /etc/profile.d
/etc/profile (Excerpt)
1
2
3
4
for sh in /etc/profile.d/*.sh ; do[ -r "$sh"]&& . "$sh"done
unset sh
Terminal - hostname:~ user$
1
sudo mkdir /etc/profile.d
Resources
The following is the collection of all the changes above along with links to download them:
# ~/.bash_profile# This file is sourced by bash for login shells. The following line# runs your .bashrc and is recommended by the bash info pages.[[ -f ~/.bashrc ]]&& . ~/.bashrc
# ~/.bashrc## This file is sourced by all *interactive* bash shells on startup,# including some apparently interactive shells such as scp and rcp# that can't tolerate any output. So make sure this doesn't display# anything or bad things will happen !# Test for an interactive shell. There is no need to set anything# past this point for scp and rcp, and it's important to refrain from# outputting anything in those cases.if[[$- !=*i*]] ; then# Shell is non-interactive. Be done now!return
fi# Put your fun stuff here.
Tcsh
Setting environment variables
For the tcsh shell, the format for setting an environment variable is setenv KEY value. The following is an example which will set the JAVA_HOME variable to /Library/Java/Home.
Terminal - [hostname:~] %
1
setenv JAVA_HOME /Library/Java/Home
Login shell
First /etc/csh.cshrc, then /etc/csh.login, then whichever of the following exists, trying in order: ~/.tcshrc,~/.cshrc; then finally ~/.login.
Non-login shell
First /etc/csh.cshrc, then whichever of the following exists, trying in order: ~/.tcshrc, ~/.cshrc.