How to mount qcow2 disk image on Linux
Question: I have a qcow2-type disk
image which is used by one my guest VMs on QEMU/KVM. I want to modify
the content of the disk image without powering on the VM, and for this I
need to mount the disk image somewhere. Is there a way to mount a qcow2 disk image on Linux?
When you run a guest virtual machine (VM) on a hypervisor, you create
one or more disk images dedicated to the VM. As a "virtual" disk
volume, a disk image represents the content and structure of a storage
device (e.g., a hard disk drive or flash drive) attached to the VM. If
you want to modify files in a VM's disk image without powering on the
VM, you could "mount" the disk image. You then would be able to modify
the content of the disk image before unmounting it.In Linux, there are ways to mount a disk image, and different types of disk images require different approaches. If you are using qcow2-type disk images (used by QEMU/KVM), there are at least two ways to mount them on Linux.
Method One: libguestfs
The first method to mount a qcow2 disk image is by using libguestfs which provides (among other things) a suite of tools for accessing and editing VM disk images. libguestfs supports pretty much all kinds of disk images including qcow2. You can install the libguestfs toolset on Linux as follows.On Debian-based system:
$ sudo apt-get install libguestfs-tools
On Red Hat-based system:
$ sudo yum install libguestfs-tools
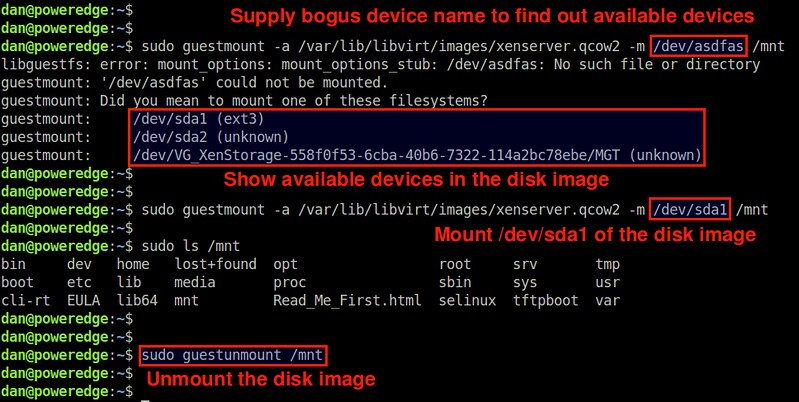
Once the libguestfs toolset is installed, you can mount a qcow2 image using a command-line tool called guestmount
as follows. Note that when a VM is running, you must *not* mount its
disk image in "read-write" mode. Otherwise, you run the risk of
damaging the disk image. Thus, it is safe to always turn off a VM
before mounting its disk image.
$ sudo guestmount -a /path/to/qcow2/image -m /path/to/mount/point
The "-m For example, to mount /dev/sda1 in the disk image 'xenserver.qcow2' at /mnt mount point, run the following.
$ sudo guestmount -a /var/lib/libvirt/images/xenserver.qcow2 -m /dev/sda1 /mnt
By default, the disk image is mounted in "read-write" mode. So you can modify any file in /mnt after mounting it.If you want to mount it in "read-only" mode:
$ sudo guestmount -a /var/lib/libvirt/images/xenserver.qcow2 -m /dev/sda1 --ro /mnt
To unmount it:
$ sudo guestunmount /mnt
Method Two: qemu-nbd
Another method to mount a qcow2 disk image is via qemu-nbd, a command-line tool that exports a disk image as a "network block device (nbd)".You can install qemu-nbd on Linux as follows.
On Debian-based system:
$ sudo apt-get install qemu-utils
On Red Hat-based system:
$ sudo yum install qemu-img
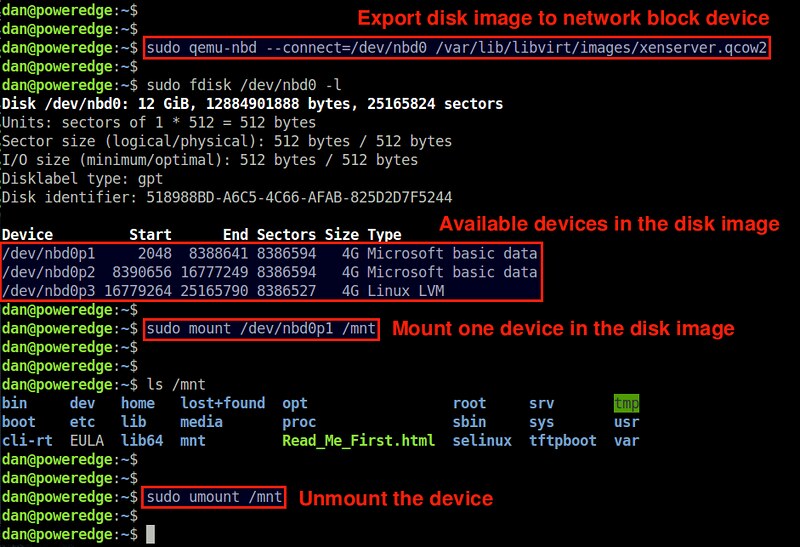
To mount a qcow2 disk image, first export the image to nbd as follows.
$ sudo modprobe nbd max_part=8
$ sudo qemu-nbd --connect=/dev/nbd0 /path/to/qcow2/image
The first command loads the nbd kernel module. The "max_part=N" option specifies the maximum number of partitions we want to manage with nbd.
The second command exports the specified disk image as a network block
device (/dev/nbd0). As a network block device, you can use /dev/nbd0,
/dev/nbd1, /dev/nbd2, etc. whichever is unused. As for the disk image,
make sure to specify its "full" path.$ sudo qemu-nbd --connect=/dev/nbd0 /path/to/qcow2/image
For example, to export the image 'xenserver.qcow2' as /dev/nbd0:
$ sudo qemu-nbd --connect=/dev/nbd0 /var/lib/libvirt/images/xenserver.qcow2
After this, existing disk partitions in the disk image will be mapped to /dev/nbd0p1, /dev/nbd0p2, /dev/nbd0p3, etc.To check the list of nbd-mapped partitions, use fdisk:
$ sudo fdisk /dev/nbd0 -l
Finally, choose any one partition (e.g., /dev/nbd0p1) and mount it to a local mount point (e.g., /mnt).
$ sudo mount /dev/nbd0p1 /mnt
Now you will be able to access and modify the content of the disk image's mounted partition via /mnt mount point.Once you are done, unmount it, and disconnect the disk image as follows.
$ sudo umount /mnt
$ sudo qemu-nbd --disconnect /dev/nbd0
$ sudo qemu-nbd --disconnect /dev/nbd0
If you use LVM on the virtual disk image then you won’t be able to mount the partition directly – you’ll need to use the vg suite of tools to detect the logical volume. Run the two below commands vgscan and vgchange as below to detect the logical volumes.
vgscan
  Reading all physical volumes.  This may take a while...
  Found volume group "pve" using metadata type lvm2
vgchange -ay
   3 logical volume(s) in volume group "pve" now active
You can then use pvdisplay to find your volume name and mount it.
lvdisplay

  --- Logical volume ---
  LV Path                /dev/pve/myvolume
  LV Name                myvolume
  VG Name                pve
  LV UUID                jgok7M-c9x1-dTdt-PXXh-8NXf-BzgG-aRsaY7
  LV Write Access        read/write
  LV Creation host, time proxmox, 2015-04-06 20:28:28 +0100
  LV Status              available
  # open                 1
  LV Size                20.00 GiB
  Current LE             5120
  Segments               1
  Allocation             inherit
  Read ahead sectors     auto
  - currently set to     256
  Block device           253:0
mount /dev/pve/myvolume /mnt/mntpoint
Nenhum comentário:
Postar um comentário