Raid 6 link
http://www.tecmint.com/create-raid-6-in-linux/
In RAID 5, data strips across multiple drives with distributed parity. The striping with distributed parity means it will split the parity information and stripe data over the multiple disks, which will have good data redundancy.

Setup Raid 5 in Linux
For RAID Level it should have at least three hard drives or more. RAID 5 are being used in the large scale production environment where it’s cost effective and provide performance as well as redundancy.
What is Parity?
Parity is a simplest common method of detecting errors in data storage. Parity stores information in each disks, Let’s say we have 4 disks, in 4 disks one disk space will be split to all disks to store the parity information’s. If any one of the disks fails still we can get the data by rebuilding from parity information after replacing the failed disk.
Pros and Cons of RAID 5
- Gives better performance
- Support Redundancy and Fault tolerance.
- Support hot spare options.
- Will loose a single disk capacity for using parity information.
- No data loss if a single disk fails. We can rebuilt from parity after replacing the failed disk.
- Suits for transaction oriented environment as the reading will be faster.
- Due to parity overhead, writing will be slow.
- Rebuild takes long time.
Requirements
Minimum 3 hard drives are required to create Raid 5, but you can add more disks, only if you’ve a dedicated hardware raid controller with multi ports. Here, we are using software RAID and ‘mdadm‘ package to create raid.
mdadm is a package which allow us to configure and manage RAID devices in Linux. By default there is no configuration file is available for RAID, we must save the configuration file after creating and configuring RAID setup in separate file called mdadm.conf.
Before moving further, I suggest you to go through the following articles for understanding the basics of RAID in Linux.
- Basic Concepts of RAID in Linux – Part 1
- Creating RAID 0 (Stripe) in Linux – Part 2
- Setting up RAID 1 (Mirroring) in Linux – Part 3
My Server Setup
This article is a Part 4 of a 9-tutorial RAID series, here we are going to setup a software RAID 5 with distributed parity in Linux systems or servers using three 20GB disks named /dev/sdb, /dev/sdc and /dev/sdd.
Step 1: Installing mdadm and Verify Drives
1. As we said earlier, that we’re using CentOS 6.5 Final release for this raid setup, but same steps can be followed for RAID setup in any Linux based distributions.

CentOS 6.5 Summary
2. If you’re following our raid series, we assume that you’ve already installed ‘mdadm‘ package, if not, use the following command according to your Linux distribution to install the package.
3. After the ‘mdadm‘ package installation, let’s list the three 20GB disks which we have added in our system using ‘fdisk‘ command.
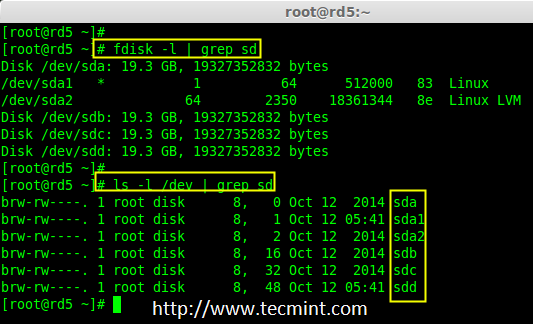
Install mdadm Tool
4. Now it’s time to examine the attached three drives for any existing RAID blocks on these drives using following command.
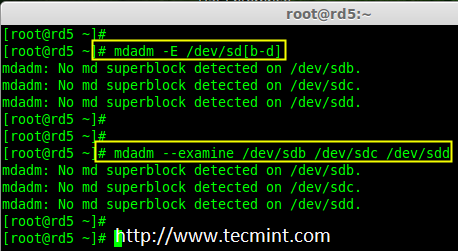
Examine Drives For Raid
Note: From the above image illustrated that there is no any super-block detected yet. So, there is no RAID defined in all three drives. Let us start to create one now.
If mdadm RAID superblock is found do the following
Example when there is already mdadm superblockmdadm --examine --verbose --scan
Code:
ARRAY /dev/md0 level=raid5 num-devices=5 UUID=e7151a0c:f703d2a9:f8ffd617:4de83260
devices=/dev/sda
ARRAY /dev/md0 level=raid1 num-devices=2 UUID=8207da4e:3b5cd80a:2f538ec9:8666be41
devices=/dev/sdb1,/dev/sda6
As you can see, mdadm detects a raid superblock on /dev/sda, where it should not.
Safely remove mdadm RAID superblock
You should run an
Code:
mdadm -E /dev/sd[b]
to see what metadata version was used on the old array. If it's 0.90, you should be able to zero the superblock with mdadm.
Code:
mdadm --zero-superblock /dev/sd[b]
Step 2: Partitioning the Disks for RAID
5. First and foremost, we have to partition the disks (/dev/sdb, /dev/sdc and /dev/sdd) before adding to a RAID, So let us define the partition using ‘fdisk’ command, before forwarding to the next steps.
Create /dev/sdb Partition
Please follow the below instructions to create partition on /dev/sdb drive.
- Press ‘n‘ for creating new partition.
- Then choose ‘P‘ for Primary partition. Here we are choosing Primary because there is no partitions defined yet.
- Then choose ‘1‘ to be the first partition. By default it will be 1.
- Here for cylinder size we don’t have to choose the specified size because we need the whole partition for RAID so just Press Enter two times to choose the default full size.
- Next press ‘p‘ to print the created partition.
- Change the Type, If we need to know the every available types Press ‘L‘.
- Here, we are selecting ‘fd‘ as my type is RAID.
- Next press ‘p‘ to print the defined partition.
- Then again use ‘p‘ to print the changes what we have made.
- Use ‘w‘ to write the changes.

Create sdb Partition
Note: We have to follow the steps mentioned above to create partitions for sdc & sdd drives too.
Create /dev/sdc Partition
Now partition the sdc and sdd drives by following the steps given in the screenshot or you can follow above steps.

Create sdc Partition
Create /dev/sdd Partition

Create sdd Partition
6. After creating partitions, check for changes in all three drives sdb, sdc, & sdd.
Check Partition Changes
Note: In the above pic. depict the type is fd i.e. for RAID.
7. Now Check for the RAID blocks in newly created partitions. If no super-blocks detected, than we can move forward to create a new RAID 5 setup on these drives.
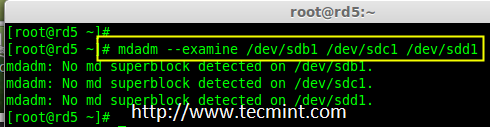
Check Raid on Partition
Step 3: Creating md device md0
8. Now create a Raid device ‘md0‘ (i.e. /dev/md0) and include raid level on all newly created partitions (sdb1, sdc1 and sdd1) using below command.
9. After creating raid device, check and verify the RAID, devices included and RAID Level from the mdstat output.

Verify Raid Device
If you want to monitor the current building process, you can use ‘watch‘ command, just pass through the ‘cat /proc/mdstat‘ with watch command which will refresh screen every 1 second.
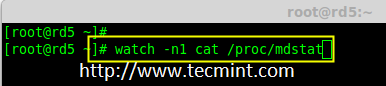
Monitor Raid 5 Process

Raid 5 Process Summary
10. After creation of raid, Verify the raid devices using the following command.

Verify Raid Level
Note: The Output of the above command will be little long as it prints the information of all three drives.
11. Next, verify the RAID array to assume that the devices which we’ve included in the RAID level are running and started to re-sync.

Verify Raid Array
Step 4: Creating file system for md0
12. Create a file system for ‘md0‘ device using ext4 before mounting.

Create md0 Filesystem
13. Now create a directory under ‘/mnt‘ then mount the created filesystem under /mnt/raid5 and check the files under mount point, you will see lost+found directory.
14. Create few files under mount point /mnt/raid5 and append some text in any one of the file to verify the content.

Mount Raid Device
15. We need to add entry in fstab, else will not display our mount point after system reboot. To add an entry, we should edit the fstab file and append the following line as shown below. The mount point will differ according to your environment.

Raid 5 Automount
16. Next, run ‘mount -av‘ command to check whether any errors in fstab entry.
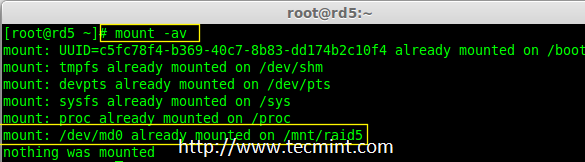
Check Fstab Errors
Step 5: Save Raid 5 Configuration
17. As mentioned earlier in requirement section, by default RAID don’t have a config file. We have to save it manually. If this step is not followed RAID device will not be in md0, it will be in some other random number.
So, we must have to save the configuration before system reboot. If the configuration is saved it will be loaded to the kernel during the system reboot and RAID will also gets loaded.

Save Raid 5 Configuration
Note: Saving the configuration will keep the RAID level stable in md0 device.
Step 6: Adding Spare Drives
18. What the use of adding a spare drive? its very useful if we have a spare drive, if any one of the disk fails in our array, this spare drive will get active and rebuild the process and sync the data from other disk, so we can see a redundancy here.
For more instructions on how to add spare drive and check Raid 5 fault tolerance, read #Step 6 and #Step 7 in the following article.
Conclusion
Here, in this article, we have seen how to setup a RAID 5 using three number of disks. Later in my upcoming articles, we will see how to troubleshoot when a disk fails in RAID 5 and how to replace for recovery.
Nenhum comentário:
Postar um comentário